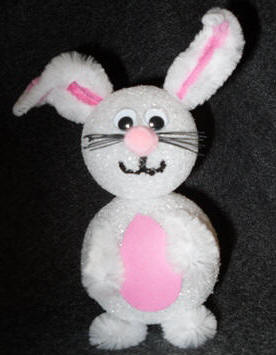
 Here's a cute little Easter Bunny made from 2 styrofoam balls.
- 1 large styrofoam ball
- 1 small styrofoam ball
- white and pink pipe cleaners(bumpy pipe cleaners if you have them)
- 1 toothpick
- white glue
- 1 pink pom pom
- 2 google eyes
- black thread
- scissors
- pink felt
- black permnent marker
Directions:
- Take the big Styrofoam ball and push it down firmly against a hard surface to make it flat on the bottom.
- Put glue on one en of a toothpick and stick it halfway, straight down into the styrofoam ball.
- Put glue on the other end and put on the smaller ball on top. This is the head.
- Cut an oval shape from pink felt and glue on the front of the body.
- Take one white pipe cleaner and fold it down into a little paw shape. Stick the pointy end into the styrofoam to secure. (The original craft called for bumpy pipe cleaners, but I think you can use reglar ones, too)
- Do the same to make the other paw, 2 fet, and a tail.
- Put a white and pink pipe cleaner together and fold on half, with the pink on the inside. Make an ear shape. Twist the ends together and stick down into the styrofoam. Make anoher ear and do the same.
- Take three lengths of black thread about 3 inches long and tie in the middle to make the whiskers. Glue to the front of the face. You can brush a little glue, so the whikers stick to the sides of the face.
- Glue a pink pom pom on top of the knot of the whiskers.
- Glue on 2 google eyes.
- Draw a little mouth under the pom pom.
If it's easier, prepare the head and body pieces seperately an stick them together at the end.
Craft Elf
No comments:
Post a Comment