Showing posts with label tissue box. Show all posts

Thursday, February 13, 2014

Tissue Box Easter Bunny Preschool Craft


Here's a cute and easy craft idea to turn an ordinary tissue box into an Easter Bunny to hold all your Easter goodies. Simple and fun to make, this is a great preschool Easter craft. Follow the link below for more details on this and lots of other great craft ideas.

East Coast Mommy

Monday, August 19, 2013

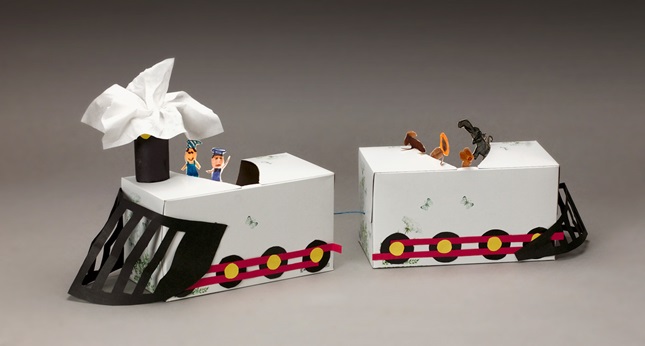
Recycled Tissue Box Train Craft

Tissue-Box Train craft

Here's a great, quick recycled craft idea. Just add a few embellishments to transform a couple tissue boxes into a cool train toy. The simplest ideas are the best. Follow the link for more details.

Crayola

Sunday, August 18, 2013

Top 10 Tissue Box Preschool Crafts for Kids

Tissue boxes are a cheap, recycled material that can easily be used to make a variety of kids crafts. Here's a round-up list of the top 10 best tissue box preschool crafts for kids. Make creatures, guitars, shoes, and other creative craft ideas.


1. Tissue Box Monster

2. Tissue Box Guitar Craft

3. Tissue Box Catapult Toy Craft

4. Refrigerator Tissue Box Craft
Preschool Crafts for Kids*

5. Box Robot Recycle Craft

Craft Jr. 

6. Christmas Fireplace Box Craft

7. Preschool Tissue Box Shoe Craft

8.  Dinosaur Feet Tissue Box Craft

9. Pirate Treasure Chest Tissue Box Craft

Recycled Tissue Box Train Craft
Tissue-Box Train craft

Search this site for even more great recycled craft ideas

Monday, August 12, 2013

Pirate Treasure Chest Tissue Box Craft


Recycle a tissue box into a pirate treasure chest with this fun kids craft idea. Use DLTK's free printables to decorate your treasure chest. Go to he site below for the tutorial.

DLTK

Saturday, July 27, 2013

Dinosaur Feet Tissue Box Craft


If you're teaching a unit on dinosaurs, why not make some dino feet with your kids. Here's cool craft idea to make dinosaur feet with tissue boxes. Follow the link to this great blog for the tutorial.

A Bird and a Bean


Tuesday, April 23, 2013

Christmas Fireplace Box Craft


This is a cute idea I got from a friend. Turn a small box into a mini fireplace complete with fire and stockings.

Materials:

  • small box (a tissue box works great)
  • checkered fabric to resemble bricks
  • wooden chopsticks
  • red and white felt
  • thread( green is nice)
  • needle
  • glue
  • scissors

Directions:

  1. Cut a rectangular opening in the side of the box for the fireplace.
  2. Cut pieces of fabric and completely cover the outside of the box.
  3. Cut some disposable chopsticks into small pieces for logs. Color the ends red with a marker.
  4. Cut a piece of jagged red/yellow felt  for fire.
  5. Glue the pieces inside for the fire.
  6. Cut some little stocking and/or snowmen shapes from felt.
  7. Thread the pieces on a length of thread and attach to the front, so they hang in front of the fireplace.

You could go all out and make little Christmas trees to go on the mantle.

Thursday, March 28, 2013

Earth Day Recycled Box Robot Craft


Here's great inspiration for a classic and fun Earth Day craft. Recycle old boxes and other things into a cool robot toy. Follow the link for more details.

She Knows

Thursday, May 31, 2012

Tissue Box Guitar Craft

This tissue box guitar craft is a classic that never gets old. Simple and fun to play.

Materials:

  • tissue box
  • rubber bands
  • paper towel roll
  • scissors
  • tape

Directions:

  1. Wrap some rubber bands around an empty tissue box.
  2. Cut one inch slits around one end of the paper towel roll and flatten out.
  3. Tape the flat end to the end of the box for a handle. Rock on!

Variations:

  1. If your box doesn't already have a pretty pattern, decorate the outside with stickers or scraps of paper.
  2. For a more professional look, trace the end of the paper towel roll on the end of the box, cut out., and insert the roll for a handle.
  3. The simplest guitar of all doesn't need a handle.
Source: Little Learners Lounge

Tissue Box Catapult Toy Craft


This tissue box catapult toy craft shoots marshmallows.

Materials:

  • family-sized tissue box
  • scissors
  • 2 unsharpened pencils
  • rubber bands
  • hole punch
  • push pin
  • pen
  • glue dots
  • plastic cap(bottle cap or 35mm file case cap)
  • tape
  • marshmallows 
Directions:

  1. Cut the top off a large tissue box as shown.
  2. Punch a hole on the side of the box about 2 inches from the end and 1/2 inch from the top of the box. Punch a matching hole on the other side.
  3. Use a push pin to make a hole on the opposite end of the box in the center, about 1/4 inch from the bottom. Enlarge the hole slightly with  pen.
  4. Cut a rubber band. Tie a small loop in one end. Insert the other end from the inside, through the small hole in the far end of the box. Tie around a short length of pipe cleaner and tape down on the outside of the box. This will be the power of the catapult.
  5. Tie 2 pencils into a cross shape with a rubber band.
  6. Insert the pencil into the holes on the sides as shown.
  7. Attach the plastic cap to the arm of the catapult with glue dots or tape.
  8. Loop the rubber band from the bottom around the bottom of the catapult arm.
  9. Pull back the arm, insert a marshmallow into the cap and let fly.
 Source: Family Fun

Saturday, May 26, 2012

Monster, Alien, Robot Box Craft

These are cute little monster, alien, robots from little cardboard boxes. They are  great creative craft for monster week, space week, Halloween, or anytime. The original craft used tissue paper, but it's pretty free-style and you can use any materials you have on hand.

Materials:

  • small cardboard boxes like jello or raisin boxes
  • pipe cleaners
  • tissue paper scraps
  • aluminum foil
  • scrap construction paper
  • glue
  • sharp knife(adult only)
  • google eyes
  • wire cutters or strong scissors
  • pencil

Directions:
  1. Brush glue over your box and cover in tissue paper scraps or aluminum foil.
  2. Glue on details like eyes, mouth, etc.
  3. Use a sharp knife to cut tiny X's to insert the pipe cleaner legs and antennae.
  4. Cut the pipe cleaners for antennae and 3 or 4 legs. Make twisty antennae by wrapping around a pencil. Make little circles or ovals at th end for the feet.
  5. Insert the pipe cleaners into the holes and stand up your little monster.
Source: Craft Jr.

Thursday, April 12, 2012

Halloween Tissue Box Monster Craft

Here's a funny monster craft recycled from a tissue box. Great for Earth Day, Halloween, or anytime.

Materials:

  • Tissue box
  • paints
  • currogated cardboard
  • scissors
  • tape
  • popsicle sticks
  • craft knife
  • foam packaging peanuts
  • pipe cleaners
  • hole punch

Directions:

  1. Remove the plastic from the inside of the tissue box.
  2. Paint entire box 1 color. Allow to dry.
  3. Paint a big mouth around the opening in a different color. Allow to dry.
  4. Cut 2 big circles for eyes and 2 ear shapes from cardboard.
  5. Paint the eyes black and the ears another color.
  6. Glue packing foam peanuts into the mouth for teeth.
  7. Paint 1 foam peanut for a nose and glue on.
  8. Glue white bottle tops to the black eyes.
  9. Cut pipe cleaners into small lengths and insert into the holes of the cardboard for eyebrows.
  10. Insert a popscicke stick between the cardboard of the eyes and ears.
  11. Punch a hole in each earlobe and tie a pipe cleanerloop for earings.
  12. Cut slits in the top and sides to insert the popsicle sticks for the eyes and ears.

Display your monster at your Halloween party. Fill with snacks, or use it for a toss game.

Full titorial with great pictures from  Plaid Kids Crafts

Monday, April 9, 2012

Refrigerator Tissue Box Craft

Here's a cool idea to turn an ordinary tissue box into a refrigerator to hold all your origami or toy food.
Materials:

  • 3 tissue(Kleenex) boxes
  • origami paper or other colorful paper
  • scissors
  • glue

Directions:

  1. On the back of a Kleenex box, cut a 7cm(2.7 inch) flap from the top. Cut it so you can open it like a door.
  2. Leave a little space and cut another 7cm flap.
  3. Leave  little space again and cut a 7 cm flap from the bottom. Cut this one completely off. It will be the vegetable crisper box.
  4. Cut the back off another Kleenex box and fit it inside the first one to make the inside back of the refrigerator.
  5. Glue colorful paper all over the outside of the box.
  6. Cut 2 6x13.5cm rectangles from another tissue box and use them to make the shelves on the inside. Fold up the ends and glue to the inside of the box.
  7. Cut a 7cm box off the end of another tissue box. This will become the crisper drawer. Glue colored paper all over the drawer.
  8. Cover another piece of tissue box with colored paper and cut 1x9cm strips and glue them on for the refrigerator handles. You could also just cut a lip in the drawer and pull it out with your finger.
  9. To make a tight fitting door, cut 2x6cm strips from a tissue box. Fold in the middle lengthwise and glue the flap to the end of the door opening. (not shown)

Wednesday, January 4, 2012

Box Robot Recycle Craft

recycled aliens full Recycled Crafts: Make Aliens & Monsters from Carboard Boxes

This is a simple way to make a cool robot from old boxes. It encourages creativity and recycling, too.

Materials:

  • paper boxes of all shapes and sizes.
  • large square of cardboard
  • glue, markers, and any other recycled decorating materials

Directions:

  1. Long before craft day, send a note home with students to bring in as many boxes as they can; cereal boxes, snack boxes, film boxes, tissue boxes, soap boxes, crayon boxes, milk cartons, etc.
  2. Give each student a large piece of cardboard as a background.
  3. Students choose and arrange the boxes into a robot or other design. Then glue against the background. It their creation can stand up, that's fine, too.
  4. Decorate and add details to your robots.

Friday, November 4, 2011

Preschool Tissue Box Shoe Craft


Here's a cute idea for making shoes from two Kleenex(tissue) boxes. Great for a lesson on clothes.

Materials:

  • two Kleenex (tissue) boxes
  • various colored craft tissue paper
  • tissue paper flowers
  • other decorations, stars, dazzles, yarn, etc.
  • glue

Directions:

  1. Make tissue paper flowers like pom poms.
  2. Glue on the flowers and other decorations to the tissue boxes.
  3. After your finished, the kids put them on their feet and walk around. Have fun.

Submit your craft! Do you have a great craft tutorial or idea you want to share and reach a wider audience? Visit my Submit page and my new, easy-to-use submission form.

Related Posts Plugin for WordPress, Blogger...