Showing posts with label mask. Show all posts

Saturday, June 28, 2014

Halloween Pumpkin Number Matching Math Activity

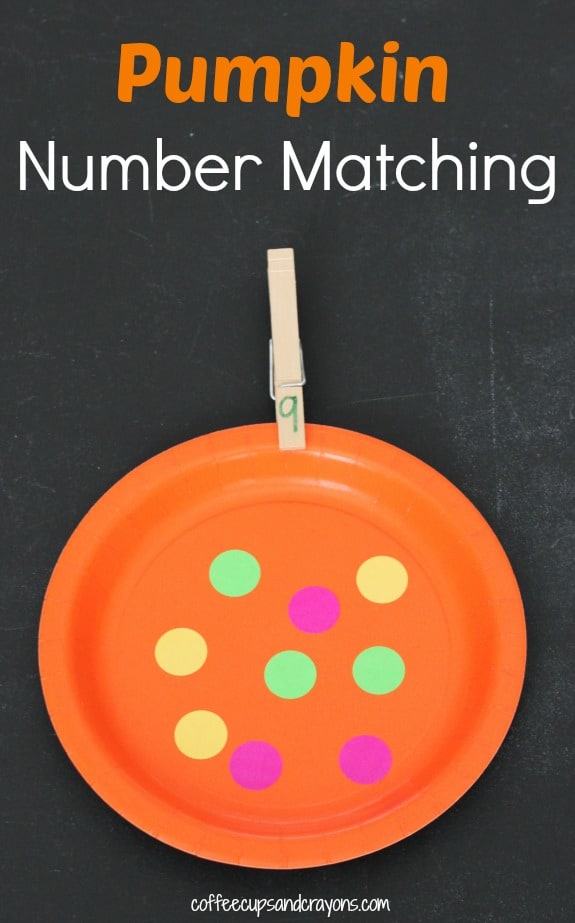
Pumpkin Number Matching Math Busy Bag

Here's a really simple math activity to do around Halloween. Kids match the correct number of dots to a paper plate with a number clothespin. You could adapt the same activity for summer and make an apple instead of  a pumpkin. Follow the link below for the full details on this activity.

Coffee Cups and Crayons

Monday, February 18, 2013

Easter Bunny Mask Craft


Use cardboard to make his simple but cute Easter Bunny mask craft. Your kids will have loads of fun hoping around as little bunnies. Follow the link for the full tutorial.

Hygloss

Tuesday, January 1, 2013

Polar Bear Paper Plate Mask Craft


Here's a super cute polar bear mask craft made from a paper plate and tissue paper. I especially like the fruit cup for the snout. Your kids will have loads of fun on Halloween, winter, or anytime. Follow the link to this great site for this and many other great craft ideas.

I {Heart} Crafty Things

Friday, August 3, 2012

Mickey Mouse Headband Craft


Here's a cute Mickey Mouse headband that my older daughter made at a festival. Simple and fun to make.

Materials:

  • various colored construction paper
  • ruler
  • scissors
  • black, yellow, and pink plastic tape like electrical tape(optional)
  • stapler
  • rubber band
Directions:

headband:
  1. Cut a strip of black construction paper 21 inches long and about 2 inches wide.
  2. Fold the strip in half lengthwise and glue together for durability. Now you have a 1 inch wide strip.
  3. Fold both ends in about 2 inches. insert a rubber band between both ends and staple the folds closed. Now you have a loop connected by a rubber band.
  4. Staple the Mickey head to the middle of the headband.

Mickey Mouse Face:

  1. Trace and cut out the Mickey head with ears from black paper.
  2. Trace and cut out the face part from peach paper.
  3. For the eyes, nose, and mouth, you have 2 choices; One, simply cut the pieces from colored paper and glue on. But, my daughter got this at a festival as an activity craft. Beforehand, the teachers had laid down strips of colored electrical tape on a cutting surface and pre-cut the face pieces, eyes, nose, and mouth with a craft knife and put on a slick surface like a whiteboard or plastic folder. At the event, the kids simply stuck on face pieces on the pre-made Mickey Mouse headband.

Easter Bunny Headband Craft


Here's my younger daughter with a cute Easter Bunny headband craft. Wear it and hop around.

Materials:

  • various colored construction paper
  • ruler
  • scissors
  • black, yellow, and pink plastic tape like electrical tape(optional)
  • stapler
  • rubber band

Directions:

headband:
  1. Cut a strip of black construction paper 21 inches long and about 2 inches wide.
  2. Fold the strip in half lengthwise and glue together for durability. Now you have a 1 inch wide strip.
  3. Fold both ends in about 2 inches. insert a rubber band between both ends and staple the folds closed. Now you have a loop connected by a rubber band.
  4. Staple the bunny head to the middle of the headband.

Easter Bunny Face:

  1. Trace and cut out the bunny head from pink paper.
  2. For the face, you have 2 choices; One, simply cut the pieces from colored paper and glue on. But, my daughter got this at a festival as an activity craft. Beforehand, the teachers had laid down strips of colored electrical tape on a cutting surface and pre-cut the face pieces, eyes, nose, and mouth with a craft knife and put on a slick surface like a whiteboard or plastic folder. At the event, the kids simply stuck on face pieces on the pre-made Easter Bunny headband.


Thursday, June 21, 2012

Halloween Frankenstein Mask Craft

This little Halloween Frankenstein mask craft is so cute. The original was made from a pre-cut wooden decoration, but you could easily trace and cut this design on cardboard. Decorate with paint and glitter.

Materials:

  • cardboard(like an old cereal box)
  • pencil
  • scissors
  • big craft stick or tongue depressor
  • craft glue
  • black, green, blue, and/or silver acrylic paint
  • paintbrushes
  • glitter

Directions:

  1. Cut open an old cereal box. Trace and cut out this simple Frankenstein design. Check your kids eyes and cut holes for your mask.
  2. Draw a line at the top for the hair.
  3. Paint the hair black, the face green, and the electrodes blue or silver. Allow to dry.
  4. Brush on craft glue section by section and cover in the matching color glitter and pour off the excess. Cut a little cardboard triangle for a nose, cover in blue glitter and glue on. Allow everything to dry.
  5. Draw or cut a line for the mouth.
  6. Glue a tongue depressor on the back for a handle. Trick or treat!
  7. You could also use aluminum foil for the electrodes.

Source: Eliza Domestica

Sunday, June 17, 2012

President's Day Mt. Rushmore Mask Craft


This is just a fabulously fun idea. Make a President's Day Mt. Rushmore mask craft from a paper plate. It could also be fun for Halloween.

Materials:

  • paper plate
  • scissors
  • Mt. Rushmore presidents faces template
  • scissors
  • crayons
  • glue
  • Popsicle stick
  • tape

Directions:

  1. Find coloring pages of all 4 Mt. Rushmore presidents. Blow them up and give a set to each child.
  2. Cut the middle out of a paper plate.
  3. Introduce Mt. Rushmore. Each child will decide which presidents' face they want to be. Students color the other 3 presidents' faces.
  4. Color the rim of the paper plate grey or brown like rock.
  5. Glue the other presidents' faces on the paper plate in the correct order.
  6. Tape a Popsicle stick to the bottom for a handle.

Source: TippyToe Crafts

Sunday, June 3, 2012

Paper Plate Cat Mask Craft

This is an adorable and easy paper plate cat mask. Your kids will have loads of fun wearing them and meowing all over the place.

Materials:

  • paper plate
  • card stock
  • pink and black construction paper
  • foam triangle
  • red crayon
  • scissors
  • craft knife(adult only)
  • glue
  • hole punch

Directions:

  1. Beforehand, check the kids eyes and draw and cut out the eye holes yourself with a craft knife. Leaf shaped eye holes look better than just circles.
  2. Glue a craft foam triangle in the center for a nose.
  3. Cut short, thin strips from black paper for whiskers. Glue three on each side of the face.
  4. Draw a red mouth with a crayon.
  5. Cut 2 big triangles and 2 smaller pink triangles. Glue together and glue to the back of the mask for ears.
  6. Punch a hole on both sides of the face.
  7. Tie 2 rubber bands together. Tie one end into the hole. Repeat on the other side.
  8. Loop the rubber bands over child's ears to wear.
 

Monday, May 28, 2012

Halloween Alien Party Mask Craft

You'll be the life of the party with these Halloween alien party masks.

Materials:

  • mask template(from site below)
  • plastic eye masks
  • green craft foam
  • permanent marker
  • scissors
  • craft knife
  • double sided foam tape
  • duct tape
  • ping ping balls
  • pipe cleaners
  • pushpin
  • 1 inch size google eyes
  • glow in the dark stickers

Directions:

  1. Follow the link below and print and cut out the mask template.
  2. Trace and cut out the head and ear pieces on green craft foam.
  3. Trace the plastic mask on the back of the foam headpiece including the eyes. Make sure the alien's eyes line up. Cut out the alien eyes.
  4. Attach the headpiece and ears to the plastic mask with double sided foam tape.
  5. Decorate the mask wit stickers and google eyes.
  6. Use a pushpin to make a hole in a 2 ping pong balls. Push a pipe cleaner into the balls.
  7. Tape the antennae to the back of the headpiece with duct tape.
  8. Wear your mask. Become an alien.


Source: Family and Fun

Saturday, April 28, 2012

Native American Kachina Mask Craft

This is a fabulous and easy Kachina doll mask craft. Kachinas are Native American Spirit messengers from the Hopi tribe of the Southwest. This mask was made from a cereal box.

Materials:

  • old cereal box
  • toilet paper roll
  • construction paper
  • scissors
  • exacto knife
  • glue
  • tape
  • hole punch
  • rubber bands

Directions:

  1. Get a good book on Hopi Kachinas and think about what design you want.
  2. Cut out the back panel of an old cereal box. Turn inside out and tape in place.
  3. Decide on a pattern and cut out the eyes with an exacto knife.
  4. Cut and decorate the front of the mask.
  5. Trace the end of a toilet paper on the mask, cut out a hole, and insert and glue the toilet paper roll for a mouth.
  6. Accordion fold some construction paper into a fan and make a headdress. Tape to the top of the mask.
  7. Punch holes on the sides of the box and tie rubber bands for a strap.
  8. Dance with your Kachina mask.


Source: Relentessly Fun, Deceptively Educational
p

Friday, March 2, 2012

Fruit Mask Balloon Craft

This is a kind of odd craft my daughter brought home from her Japanese elementary school. It's a fruit mask that has inflatable parts. The concept was using a plastic bag or glove and straws to make a hidden inflatable effect. The long one is a disposable umbrella baggy that's common in Japan. This Fruit mask was the end result, but you could make it any theme.

Materials:

  • piece of colored construction paper or card stock
  • 5x1.5 inch rectangle from card stock or construction paper
  • plastic glove
  • plastic bag, preferably a long skinny one
  • 2 bendable straws
  • tape
  • markers
  • scissors or box cutter

Directions:

  1. Fold the sheet of card stock in half and open again. Glue the small rectangle in the center of the sheet on the back side.
  2. Cut a small rectangle near the top for a window and a small hole near the bottom for the straw to go through.
  3. Flatten your plastic glove and bag and draw on colorful fruit, animals, or other themes with markers.
  4. Decorate the front of the card stock with markers.
  5. Insert one straw through the small hole and tape the other to the rectangle. Tape together at the bottom.
  6. Tape the plastic glove and bag over the ends or the straws so they are airtight.
  7. Hold the mask up to your face and blow through the straws.

Paper Plate Pasta Face Mask Craft

 Here's a simple idea to make a face mask craft using a paper plate and pasta. This is a fun craft when teaching about the parts of the face or "myself".

Materials:

  • paper plate
  • marker or pen
  • various kinds of raw pasta, macaroni
  • glue

Directions:

  1. Talk about the different parts of the face. Show pictures and demonstrate how to draw a simple face.
  2. Give each student a paper plate and have them draw a face.
  3. Then let them glue pasta on all the features of the face, shells for the eyes, curved macaroni for ears, twisted pasta for hair, etc. Allow to dry.
  4. Students have fun showing their new faces.


Saturday, February 18, 2012

Lamb Lion Paper Plate Flip Mask Craft


This is a simple and fun craft that takes its inspiration from the expression "March goes in like a lion and goes out like a lamb." Use a paper plate to make this reversable double sided mask. These pictures came from a great website, The Art of Family

Materials:

  • paper plate
  • scissors
  • cotton balls or wadded tssue
  • yellow tissue or crepe paper
  • black and brown constructon paper
  • glue

Directions:

  1. Fold a paper plate gently in half and cut a slit in the middle and then cut the center out.
  2. Cut yellow crepe paperi nto short strips and glue all the way around the back of the paper plate rim to make the lion's mane.
  3. Cut lion shaped ears from brown paper and glue on to the lion's face.
  4. On the front side, glue cotton balls or tissue paper all around the rim.
  5. Cut oval shaped lamb ears from black construction paper and glue on the lamb's face.


Tuesday, January 31, 2012

Funny Face Paper Plate Mask Craft

This is a really easy and fun paper plate craft you can make with a few magazines. It's good for a theme about the body, senses or "All About Me".

Materials:

  • paper plate
  • old magazines
  • glue
  • scissors
  • Popsicle stick
  • tape

Directions:

  1. Beforehand you can cut out face parts from old magazines; eyes, noses, ears, and mouths. Or students can do it themselves.
  2. Pu all the face part pictures in dishes. Let students choose 2 eyes, 2 ears, a nose and mouth. It's funnier if all the pieces don't match.
  3. Glue face parts onto your paper plate.
  4. Tape a Popsicle stick to the back for a handle.
  5. Students can show off their funny faces.

Sunday, October 2, 2011

Lion Mask Paper Craft


Here's a great-looking lion mask craft that's great for your next class party. The template comes from the Arts and Crafts For All Seasons series of books by The Mailbox, http://www.themailbox.com/

Materials:
  • lion mask template on card stock paper
  • narrow leaf shape cutouts of various colors for the mane
  • 4 rubber bands
  • glue
  • yellow crayons
  • hole punch
  Directions:
  1. Cut out the lion mask template.(You may have to help the children cut it out, especially the eyes)
  2. Punch one hole on each side with a hole punch.
  3. Color the mask yellow.
  4. Glue leaf shapes around the back side for the mane.
  5. Tie one rubber band through each hole and tie on one more rubber band to loop over their ears.

Submit your craft! Do you have a great craft tutorial or idea you want to share and reach a wider audience? Visit my Submit page and my new, easy-to-use submission form.

Related Posts Plugin for WordPress, Blogger...