Friday, May 18, 2012

Plastic Bottle Cap Top Craft Toy

I love tops and I really love this plastic bottle cap tops craft idea. This was originlly a Hanukkah dreidle idea, but anyone can enjoy tops anytime.

Materials:

  • plastic bottle caps
  • toothpicks
  • colorful electrical tape
  • sharp needle or tool for making holes in leather(adults only)
  • glue
  • reflective paper, stickers, etc.

Directions:

  1. Poke a hole in the exact center of the bottle cap. Some caps already have an indintation there.
  2. After making the hole, decorate the insie of the cap with stickers or colorful paper if you like.
  3. Break off one sharp end of a toothpick and decorate with electrical tape.
  4. Insert toothpick into cap and secure with a spot of glue if necessary.
  5. Spin your top.

Source: Creative Jewish Mom

Plastic Bottle Cap Letters Craft

I thought this plastc bottle cap letters craft idea was fabulous. So simple and useful. This is especially good for homeschoolers. These letters are great for spelling games. Make your own version of Scrabble. Make 2 sets of upper and lowercase and do a matching activity. They'll become a valuable resource you'll use again and again.

Materials:

  • Lots of plastic bottle caps, washed and dried
  • Newspaper, old magazines or books, or letters template
  • scissors
  • glue

Directions:

  1. Find and cut out letters of the alphabet from old newspapers, magazines, or books. You could also find a nice professional looking set of leters online an print out, but I think cutting and pasting from old magazines is more fun.
  2. Glue letters on top of bottle caps.
  3. Store letters in an old jar.

Source: Shared Threads

Easter Bottle Cap Crosses Christian Craft


This is a great Christian Cross craft idea using bottle caps and family photos. It's good for a kids bible study craft or an Easter craft.

Materials:

  • bottle caps, 10 per cross
  • ribbon
  • scissors
  • glue
  • jumbo craft sticks
  • family photos
  • Paint(optional)

Directions:

  1. If desired, paint craft sicks with paint and allow to dry, beforehand.
  2. Trace around family pictures with a bottle cap. Cut out pictures inside the line, one photo for each bottle cap.
  3. Glue craft sticks together in a cross shape.
  4. Glue pictures into bottle caps an glue bottle caps onto the cross. Allow to dry.
  5. Tie ribbon into a loop and lue o tape to the back of the cross.

Source: FavCrafts

Plastic Bottle Birdfeeder Craft

Here's a great plastc bottle birdfeeder craft that looks much cooler than just an empty bottle. It's a great recycled craft for Earth Day. It's the craft that keeps on giving and not only helps the local bird population, but will offer hours of viewing enjoyment.

Materials:

  • window and roof template(from site below)
  • 9” x 16” piece of cardboard
  • washed and dried 2-liter plastic soda bottle with cap
  •  brown and black spray paint
  • Craft knife
  • 3/16” hole punch
  • 3” square white shrink plastic
  • Paintbrushes
  • Drill with 18” and 1/16” bits
  • 16” length of braided cord
  • 2-1/2” length 1/16” wood dowel
  • Clothespins
  • Pine bark pieces
  • Wooden craft stick
  • Fine-tip permanent black marker
  • glue
Directions:
  1. Print out the roof and window templates. Trace and cut out the rof piece from cardboard.
  2. Spray paint both sides of the roof and the cap black. Spray paint the bottle brown. Allow to dry.
  3. Cut about a 1-3/4 inch hole on the bottl about 3 inches from the bottom. Punch a hole below the hole for the perch.
  4. Color and glue on the window.
  5. Add glue and push in the dowel for the perch.
  6. Drill a hole in the cap. Fold the cord and push through the hole from the bottom to for a loop. Tie the ends beneath in a knot.
  7. Fold the cardborad into a cone and glue the ends together. Secure with clothespins until dry. Cut a hole in he top of the cone for the hanger.
  8. Glue tree bark pieces on the outside of the roof and allow to dry.
  9. Make a simple "Welcome" sign from paper or wood and tape or hang above the door.
  10. Fill with birdseed, screw on the cap with the loop. Place the roof on top, pull the loop through and hang up in a tree.
  11. Make birds fat.


Source: Fav Crafts

Miniature Kite Craft

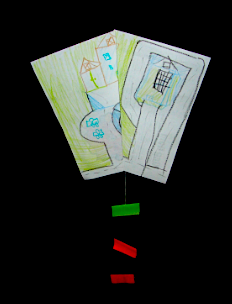
Here's a miniature kite craft that's simple and fun to make. The kite pictured here is only about 4.5 inches long.

Materials:

  • kite template(from site below)
  • crepe paper
  • card stock
  • scissors
  • thread
  • wooden clothespin or cardboard strip to wind the thread
  • tape
  • glue
  • sewing needle

Directions:
  1. Visit the website and print out the template. Trace and cut out from crepe paper.
  2. Cut 2 thin strips from card stock for the frame. They should match the length and width.
  3. Cut out or tie three small paper bows. Thread them with a needle on thread. Tie each bow at the bottom to make the tail
  4. Tape the tail to the end of the longer frame stick.
  5. Glue the frame onto the kite with the tail at the bottom.
  6. Glue the other template piece onto where the frames meet.
  7. Poke a hole in the tip and tie the thread of the kite flying line. Add tape to secure.
  8. Measure the kite flying thread at about 6 feet. Wrap around a clothespin or piece of cardboard.
  9. Go fly your kite.


Source: Zakka Life

Thursday, May 17, 2012

Easy One Sheet Kite Craft 1

This is probably the easiest kite craft to make in the world. It only takes a few minutes and makes for hours of fun.

Materials:

  • 1 sheet of letter size, A4 paper(8.5x11 inches)
  • ruler
  • pencil
  • tape
  • bamboo skewer for kebabs
  • crepe streamers or colorful tape
  • hole punch
  • 10 or more feet of string
  • piece of cardboard

Follow the link below for a complete step by step tutorial with great pictures.

Source: Family Fun

Easy Paper Sled Kite Craft 2

Here's an easy one sheet of paper sled kite craft.

Materials:

  • 1 sheet of letter size, A4 paper
  • newspaper
  • scissors
  • ruler
  • pencil
  • kite string
  • tape

Directions:
  1. Fold the copy paper in half lengthwise.
  2. Fold each side in half again to the middle center line.
  3. Fold each side in half again back onto itself, so you get 2 "Z" shape folds o each side.
  4. Mark a spot on either side, about 2 inches(5cm) from the end. This is where the bridle will attach.
  5. Cut a 40 inch(1 m) length of string for your bridle.
  6. Poke holes on the kite marks and tie either side of the string.
  7. Fold your kite together and stretch the bridle to find the center of the string.
  8. Tie a loop in the center of the string. This is where you'll attach the kite flying string.
  9. Cut a 2 inch(5 cm)x 60 inch(1.5 m) strip of newspaper for the tail.
  10. Tape the tail to the back of your kite.
  11. Tie on the kite string and fly your kite.

Source: Dave's Sled Kite

Wednesday, May 16, 2012

Easy Paper Kite Craft 3

Here's another paper kite craft you can make from 1 letter size, A4 sheet of paper. This Adam's kite design looks similar to Dave's kite, but the folds go up.

Materials:
  • 1 sheet letter size, A4 paper
  • newspaper
  • kite string
  • ruler
  • pencil
  • scissors
  • tape

Directions:

  1. Find the center line of the paper lengthwise, but don't fold. Mark a dot on the center line about 1 inch from the edge on either ends of the paper (short sides).
  2. Mark a line 1.8 inches(4.5 cm) in from the edge of one long side. Fold the paper up on the line.
  3. Repeat the same on the other long side and fold up. Now you have a paper with the long sides folded up.
  4. Cut a strip of newspaper or crepe streamer 2 inches (5cm) wide and 60 inches(1.5 m) long to make the tail. You can tape 2 shorter strips together.
  5. Tape the tail to one end of your kite.
  6. Make a small hole on the dot o the other end and tie your kite string. You might secure with tape.
  7. Fly our kite.
Full tutorial with photos :Hi Fly Kites

Saturday, May 12, 2012

Christmas Orange and Cloves Pomanders Craft


Sugar magnolia


Techno-billies


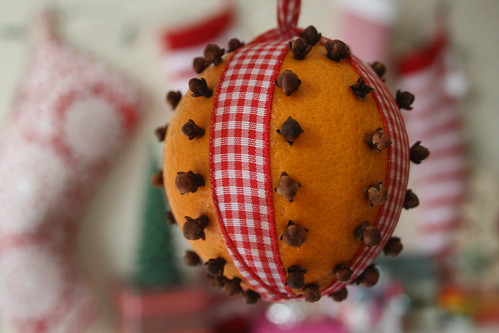
Pommanders are a great smelling Christmas tradition. However, originally, pomanders weren't just for Christmas. In Elizabethan times, pommanders were used all year round. as air fresheners in closets and in drawers. Women even carried them on their person as a kind of deodorant. People didn't bath everyday in those times.

You need to plan ahead. The tricky part of making pomanders is drying them out before they start to get moldy. Orris root is very important. It's a preservative. I've never made successful pommanders that lasted without it. Cover them generously with the orris root powder and hang them up or place them in a bowl in a warm dry place. A sunlit window is nice It takes several weeks to dry completely. They will become very small and hard. If dried successfully, they should last for many years.

Some people have shown allergic reactions to orris root. Sandalwood oil is a substitute for orris root powder. This orris root powder alternative will preserve your pomanders well.

Materials:

  • oranges
  • whole cloves
  • toothpicks
  • Powdered spices; cinnamon, nutmeg, allspice, cloves
  • orris root powder
  • ribbon
  • large bowl


Directions:

  1. Tie a ribbon on 4 sides around your orange.
  2. Use a toothpick to start your holes. Insert whole cloves all over the orange. Put them in lines or simple patterns. Make it a family event. Be sure to leave space between the cloves. The orange will shrink.
  3. Mix 1 teaspoon each of the spices in a large bowl. You don't need all of them, these are some suggestions.
  4. Mix in 4 teaspoons of orris root powder.
  5. Make several pomanders and cover generously with the powder.
  6. Put the bowl in a warm, dry place like a sunlit window Turn the oranges everyday, mixing the powder. Add a little more orris root powder to be sure. The bowl of pomanders makes a great centerpiece. Or you can hang them up. It will make the whole house smell great.
  7. It will take several weeks for the pommanders to dry completely. You will have to re-tie the ribbon or maybe remove completely. They will be small and hard. Dust them off and place them in closets or drawers all year round. Give them as gifts.


Submit your craft! Do you have a great craft tutorial or idea you want to share and reach a wider audience? Visit my Submit page and my new, easy-to-use submission form.

Related Posts Plugin for WordPress, Blogger...