Showing posts with label recycled crafts. Show all posts

Friday, January 16, 2015

Mother's Day Recycled Flower Vase Craft


This is the same as the Father's Day pencil holder, but here, we made a flower vase for Mother's Day.

Materials:

  • toilet paper roll
  • paper clay 
  • paint, brushes
  • cardboard, cereal box
  • scissors
  • glue


Directions:
  1. Trace a circle on cardboard or a cereal box about 8 cm or 3 inches across and cut out. This is about an inch or so wider than the the end of the toilet roll. 
  2. Flatten out the paper clay to an even thickness about 0.2 inches or 0.5 cm.
  3. Trace a rectangle about 11.5 x 13 cm (4.5 x 5 inches) in the clay with a putty knife and peel off the excess. This will wrap around the toilet roll. An easy way is to take another toilet roll, cut lengthwise, flatten, and trace around it, but with a little extra the long way.
  4. Smear glue on the clay and toilet roll and roll and roll the clay around.
  5. Glue the wrapped toilet roll to the cardboard base. 
  6. Glue more clay around the base. Allow to dry a little.
  7. Paint the pencil holder and put the message, "I Love Mom". She'll love it.

Father's Day version:


Father's Day Recycled Pencil Holder Craft


Dad's like practical gifts. Here's one that he'll love. Recycle a toilet paper roll into a pencil holder for his desk. He'll be so surprised.

Materials:

  • toilet paper roll
  • paper clay 
  • paint, brushes
  • cardboard, cereal box
  • scissors
  • glue


Directions:
  1. Trace a circle on cardboard or a cereal box about 8 cm or 3 inches across and cut out. This is about an inch or so wider than the the end of the toilet roll. 
  2. Flatten out the paper clay to an even thickness about 0.2 inches or 0.5 cm.
  3. Trace a rectangle about 11.5 x 13 cm (4.5 x 5 inches) in the clay with a putty knife and peel off the excess. This will wrap around the toilet roll. An easy way is to take another toilet roll, cut lengthwise, flatten, and trace around it, but with a little extra the long way.
  4. Smear glue on the clay and toilet roll and roll and roll the clay around.
  5. Glue the wrapped toilet roll to the cardboard base. 
  6. Glue more clay around the base. Allow to dry a little.
  7. Paint the pencil holder and put the message, "#1 DAD". He'll love it.


You can use this same idea to make a flower vase for Mother's Day.


Monday, January 5, 2015

Paper Plate Dinosaur Stegosaurus Craft


This is my new improved version on the Paper Plate stegosaurus dinosaur craft. The latest innovation is using toilet paper rolls for the legs so it stands up on it's own. Give it a try.

Materials:

  • paper plate
  • toilet paper roll
  • scissors
  • red paper
  • green paint, paintbrush
  • pencil
  • felt pen
  • tape


Directions:

  1. Cut the paper plate an toilet paper roll in half.
  2. From one half of the paper plate, trace and cut out the stegosaurus' head and tail piece. Use the natural curve of the plate for the tail. 
  3. Paint all the pieces green except for the tail spikes and allow to dry.
  4. Tape the head and tail pieces on the back of the paper plate.
  5. Cut some triangles from red paper and tape to the back for the dorsal plates.
  6. Cut two slits about halfway down the toilet rolls so they line up and insert the plate.
  7. Draw details on the face and toes or cut out toes and glue on.
  8. Your stegosaurus stands up.


Be on the look-out for more dinosaurs coming soon.


Wednesday, December 31, 2014

A Crafty Way to Re-Use Old Make-Up Brushes

It’s always useful to have a range of tools to help you put on your make-up in the morning, but sometimes things start accumulating. Before you know it, you have more make-up and equipment than your bathroom shelves can carry. Applicator brushes are particularly troublesome – taking up lots of precious storage space.

Luckily, if you’ve got kids around these brushes can make a fun craft project for little ones, helping you clear a bit of space and giving them something creative to do. With a bit of paint and some googly eyes your everyday make-up brush can become a fun, crazy-haired character – all you need to know is how to clean makeup brushes! If you have a few different brushes you can make a whole family. Here’s how:

1.       Start by working out which brushes you actually use on a regular basis and those that have sat at the back of your cupboard for months. Give those you’ve chosen to ‘up-cycle’ a thorough clean. No one wants to get make-up all over them while doing a craft project! There are plenty of guides on how to clean makeup brushes online. Make sure to avoid products that might damage the stem or head.

2.       Right, time for some craft: To create your fun little brush-haired people start by getting some paints that will cover the existing surface of the handle. As they’re likely to be plastic or wood, you will need to choose the type of paint carefully. Go for bright colors to make it fun.

3.       Use a top layer of paints to draw different outfits on the handles. Tuxedos, dresses, ties, dungarees – the options are endless, you just have to work out how best to represent them on the little handle. It can be a challenge, but that’s half the fun. If you have sparkly nail-varnish to hand you can even use it to give your little guys some glitz.

4.       Now get your googly eyes; these go on the handle directly below the bristles. This section is usually covered in metal or another material to help secure the bristles in place, so use it as a face. To attach the eyes you’ll need some strong glue – just be careful not to get it on your fingers or other surfaces, and supervise children at all times.

5.       Next add some arms. These can be made from a whole host of different materials including paper, pipe cleaners, thin cardboard, string, or wire, depending on what you have to hand and how fixed you want the arms to be. Secure them in place with more glue or discrete pieces of sticky tape.

6.       Voila: a fun little guy with exciting bristle hair! Get creative and give them different hairstyles by creating tiny braids, cutting a Mohican, or coloring some strands with corrector fluid. Once you’ve done a few of them, the kids will have a little community on their hands. Older children could even create brush people unsupervised after the first batch, once they know how to clean makeup brushes – although you may want to hide the brushes you don’t want transformed! Don’t worry if you’ve got lots of different shapes and sizes, that will just make the group more fun to play with: you could even create a family. Enjoy! 

Crafty Ideas to Declutter Your Home


It’s easy to fill up a home without realising it – buying new clothes and toys for the children, getting gifts, and piling up the shelves with books. But when it all gets a bit too much, it’s time to start making some space. No one likes throwing things away, but don’t worry – help is at hand. If you need to get rid of your clutter and have a crafty side, here are a few projects to help clean up your home.  

Kitchen

The kitchen is always quick to fill up with new foods and the latest gadgets, but there are ways to get a bit more counter space and make some fun new household objects in the process. Start with all those old jars that tend to pile up in the cupboard – these are usually waiting to be filled with home-made jam that never gets made. Fill them instead with some sand and then use a tea light to make romantic candles for inside the house or out. Other containers can come in handy as flowerpots – just put a few small holes in the bottom to let excess water flow out. A quick trip to your local art shop will get you the right kind of paints to decorate them in fun colors, too.

  
Living room

When it comes to tackling clutter in the lounge, it’s all about creating storage space. Here’s one handy trick: get a small cardboard box and some old hardback books you no longer want. Separate the book covers from the pages and stick them around the outside of the box, with the spines along a single edge. Now when you place the box onto the shelf it looks like old books – but is instead a handy little nook for all those odds and ends that get scattered around. Another clever little trick is to store up old carpet tiles. Cut them into little pieces and use them to create a mosaic on a firm backing. With no hassle at all, you've created your own unique bulletin board for reminders, notes, tickets, and cards.

Bedroom

CD CoastersNo one likes to sleep in an untidy room, and all that mess can cause unnecessary stress – so declutter with these useful tips. Firstly, root through the closet for all the shoes you still like, but have never quite found the right occasion to wear. Recycle them by adding some potpourri and putting them in interesting places throughout the house. The best thing about this idea is that you can still use them as shoes at a later date by just removing the contents – they’ll just smell great. You could also try getting rid of your old scratched CDs by covering them with brightly colored felt and using as drinks coasters. It’s a great way to avoid waste and those nasty watermarks at the same time. Finally, don’t be afraid to do your research – there are some great ideas to help you declutter your home online.

Now you know these tips, there’s no excuse for a messy home! Get creative and rework that junk into exciting new items for any room in the house.


Saturday, December 27, 2014

Homemade Watercolors for Kids


With the Christmas holidays upon us, everyone’s looking for activities to keep the children occupied while ‘Santa’ does all his work. Painting is an activity sure to keep the kids busy for hours, but what if you have no suitable paint in the house and enough shopping to do without adding this to the list? Luckily, there’s a quick and easy way to make watercolor paints using products already in the kitchen. Here’s it is…

Ingredients:

  • -          Vinegar
  • -          Baking soda
  • -          Cornflour
  • -          Golden syrup
  • -          Food coloring


Equipment:

  • -          Ice-cube tray
  • -          Bowl
  • -          Tablespoon


Method:

The great thing about this recipe is that you can easily increase or decrease quantities depending on how much paint you want, as it’s all down to ratios. You’ll need equal parts white vinegar and cornflour, twice the amount of baking soda and one quarter the amount of golden syrup. Mix the baking soda and vinegar together – they’ll fizz, but this is completely normal. Just wait for the fizzing to stop, then mix in the golden syrup and cornflour. Pour equal parts of the mixture into each section of the ice-cube tray then add the food coloring, using more for dark colors, and less for lighter colors.

Now, just sit back and wait for your watercolors to dry. This could take up to 2 days, but if you leave them somewhere warm 24 hours is generally enough. Then hey presto! Free paints as good as any you can buy in the shops.

Idea for Watercolor Projects

Now you’ve got the paints to hand it’s time to try out some messy play ideas! Try recreating a Jackson Pollock masterpiece by flicking paint onto a large sheet of white paper. Or use your paints to give drawings exciting new hair styles. Just draw a person without any hair then dab some paint over the hairline and blow. You’ll create wild, crazy styles and if you use a range of colors – a multicolored hairstyle too!

Another fun idea is to snip rubber bands and stretch them over the open side of a cardboard box. Tie at each end, then place paper at the bottom and drip paint on the rubber strings. Now get plucking. Not only will you make musical sounds, but the paint will also create marvellous patterns on the paper below.


So what are you waiting for? Get painting! 

Friday, December 12, 2014

Egg Carton Christmas Tree Ornaments Craft


Here's a really cute and resourceful recycled craft idea submitted by Adrianna at Earthy Girl.  Use egg cartons o make cute little Christmas tree ornaments.

Materials:

  • egg carton
  • scissors
  • green paint
  • pipe claners
  • spangles and sequins to decorate
  • glue


Directions:

  1. Cut the cones out of an egg carton.
  2. Paint green and allow to dry.
  3. Decorate with glitter and glue on sequins.
  4. Make a hole and tie a gold pipe cleaner at the top.
  5. Hang on the tree.


Visit Earthy Girl for more details on this and loads of other great crafty ideas.


Sunday, November 23, 2014

Thanksgiving DIY Native American Costume Craft

Thanksgiving Kids Native American Vest Craft

Get creative this Thanksgiving. Turn an old cardboard box into a cute Native American vest for your little ones. This is great to do a play on the Pilgrims and Indians. Visit the site below for the complete tutorial.

Mom it Forward

Friday, November 14, 2014

Toilet Paper Roll Christmas Tree Craft

Easy kids craft - recycled toilet paper roll Christmas tree plaque

Here's an awesome recycled craft idea for Christmas. Decorate three different lengths of toilet paper rolls in a triangular formation with a piece at the bottom for a pot and make a cute Christmas tree like this. Attach to a sturdy background and hang up. Follow the link below to this great site for the full tutorial.

Modge Podge Rocks

Friday, October 31, 2014

Thanksgiving Turkey Sock Craft


This is so cute. Turn an old sock into a fat little turkey for Thanksgiving. This makes a great centerpiece. Visit the site below for the full tutorial.

Planet Forward

Coffee Can Pilgrim Hat Bank Craft

Coffee Can Pilgrim Hat

I really like this. Decorate an old coffee can into a pilgrim hat for Thanksgiving that also doubles as a coin bank. Use it as a centerpiece or by the door to collect money for your favorite charity. This is great for a school function. Visit he great site below for the full details.

DLTK

Recycled CD Cardinal Craft

How to Make a Cardinal Using an Old CD

This is such a cute and easy idea. Recycle an old CD with felt and feathers into a cute, fat cardinal. This is a great craft idea for Earth Day, spring, or anytime. Visit the site below for the full tutorial.

About Family Crafts


Friday, October 3, 2014

Recycled Puzzle Pieces Fall Tree Craft


This is a really clever idea. Paint old puzzle pieces in fall colors and use them to make a cool 3D Fall tree craft like this. This one uses yarn for the tree trunk. Follow the link for more details and pictures.

Thrice the Spice

Easy Fall Leaves Lantern Craft

decoupage candle

It doesn't get much simpler than this. Use artificial leaves and a recycled mason jar to make a beautiful fall leaves lantern like this for Thanksgiving. Mod Podge the leaves on the jar in this decoupage craft idea. Just add the candle. Follow the link for the full tutorial.

Kids Activities Blog

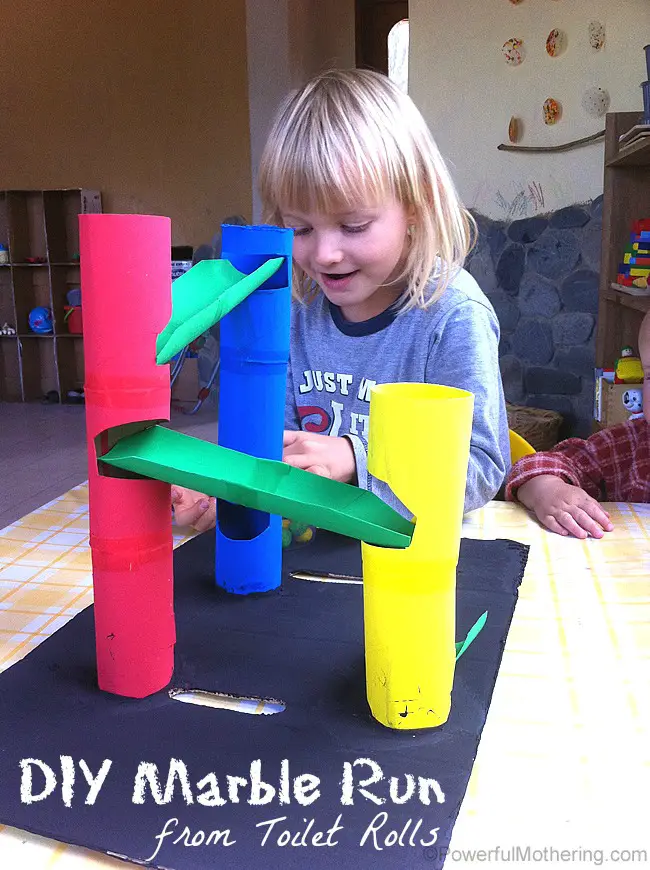
Fun Recycled Toilet Paper Marble Run Toy Craft

DIY Marble Run from Toilet Rolls

I just love this idea. Recycle toilet paper rolls into a fun marble run toy like this. Paint, cut, tape together. This simple idea costs nearly nothing and will make for hours of fun for the kids. Visit the site below for the full tutorial.

Powerful Mothering

Wednesday, October 1, 2014

Recycled Candy Wrapper Thanksgiving Turkey Craft

Candy Wrapper Turkeys

Here's a great alternative Thanksgiving turkey craft idea. Recycle candy wrappers into a colorful and eco-friendly turkey like this. This really lets kids imagination go wild. This concept would be great adapted for Earth Day or any theme. Follow the link for more.

Housing a forest

Sunday, September 28, 2014

Recycled Cooking Oil Candle Craft


Looking for a way to recycle all that cooking oil after dinner? Here's a simple and resourceful idea to make small candles from waste cooking oil. This is a good activity to do with the Easy Japanese Paper Lantern Craft.

WARNING: Fire Hazard!
This activity must be done under close adult supervision. Don't use candles inside. Do not leave candles burning unattended!

Materials:


  • used cooking oil
  • old cloth or rag
  • container to catch filtered oil
  • oil coagulant (optional)
  • a paper clip
  • thick cotton string or wick
  • aluminum muffin tin or used tea light tin


Directions:


  1. Use an old cloth or rag to filter impurities from used cooking oil. 
  2. Open a paper clip so it sits with end sticking up as shown above.
  3. Cut a length of wick or thick cotton cord and insert the open paper clip rod up inside the cord to make your wick stand. 
  4. Place the wick stand in an aluminum muffin tin or used tea light tin.
  5. Use an oil coagulant if desired. I often find used cooking oil will coagulate by itself.
  6. Pour some oil into the tin. 
  7. Light your oil candle.


Warning: The oil candle makes black smoke and smells like whatever you were cooking.


Saturday, September 27, 2014

Easy Toilet Paper Roll Kaleidoscope Craft


Here's a really simple recycled toilet roll kaleidoscope craft for kids. Actually it's not a proper kaleidoscope, nothing turns or needs a mirror. This is a perfect for Kindergarten or Elementary students. Te one pictured above was taped to the window, but you can just hold it up to the light.

Materials:


  • toilet roll tube
  • colorful cellophane
  • non-sticky, reflective/holographic tape
  • colorful paper
  • decorative tape or paper
  • scotch tape
  • wax paper
  • scissors
  • glue


Directions:


  1. Cut a toilet roll tube into 1/4 sized rolls.
  2. Roll and glue holographic/reflective tape into very small loops or tear drop shapes. 
  3. Lay the 1/4 toilet roll on the table and fill with the reflective loops.
  4. Place small, irregular pieces of various colored cellophane over the top of the roll and tape everything in place with clear, scotch tape. Now, one end of the toilet roll is completely closed and looks like a small stained glass window and there are little reflective loops inside. 
  5. Turn over the toilet roll.
  6. Trace the toilet roll opening on wax paper and cut out with a little extra around the traced circle. 
  7. Place the wax paper over the open end of the roll and tape the sides down securely. 
  8. Now decorate the outside of the toilet roll with colorful adhesive tape, stickers, or paper .
  9. Hold the the kaleidoscope roll up to a light or window and look through the wax paper end. Roll with your fingers and see the swirls of various colors.


Thursday, September 18, 2014

Thanksgiving Mayflower Crayon Box Craft


Here's a cute and practical Thanksgiving craft idea. Recycle a milk carton into a Mayflower ship crayon holder complete with toilet roll sails. It's the craft that keeps on giving long after the holiday. Follow the link to see how they did it.

It's Overflowing

Saturday, August 23, 2014

Hairy Friends Recycled Craft

How to Make Hairy Friends

Here's a great idea for a summer or recycled craft project. Spray paint a margarine tub, Decorate a face with whatever you like, then fill with soil and grass seed to grow hair. This is similar to the eggheads craft, but will last a lot longer. Visit the great site below for the full details.


About Family Crafts


Sherri Osborn
Craft Designer--Writer--Editor--Blogger--VA
  --Facebook  --  Twitter  --  Google+   --  Pinterest  --
               ---- Subscribe to my Newsletter ----

Submit your craft! Do you have a great craft tutorial or idea you want to share and reach a wider audience? Visit my Submit page and my new, easy-to-use submission form.

Related Posts Plugin for WordPress, Blogger...