Showing posts with label origami. Show all posts

Thursday, May 8, 2014

Funny Father's Day Photo Drinks Craft


Here's a funny and decorative craft idea Dad will love for Father's Day. Use paper folded to look like a shirt and Dad's photo to create these simple photo drink bottle covers. Dad will get a laugh when he sees the bottle looks like him! Visit the cool site below for the full step by step instructions. They're easy to make, too.

Tatertots and Jello

Friday, April 25, 2014

Father's Day Fortune Cookies Craft


This is really cool and original Father's Day craft idea. Customize a Chinese take-out box and some card stock circles to make little fortune cookies with a special message inside. The fortune cookies are so easy to make. I love this idea. You could make these for lots of other occasions besides Father's Day. Go t the cool site below for the step by step tutorial.

An Ounce of Creativity

Monday, March 24, 2014

Mother's Day Japanese Paper Flowers Craft


Here's a cute and easy way to make origami flowers craft or Mother's Day , straight from Japan. Fold a length of colorful paper in half and cute slits along the fold, then wrap around a pencil to make the flowers. Follow the link below for the complete step by step photo tutorial.

All About

Monday, February 24, 2014

Easter Foldout Origami Book Craft

easter foldout book


Here's a creative Eater craft idea. Put several sheets of colorful, folded origami paper together to make this fun Easter foldout book. This is a great activity for older kids. Go to the great site below for the ull step by step tutorial.

Mom's Madhouse

Saturday, August 10, 2013

10 Easy Origami Crafts for Kids

Origami, the Japanese art of paper folding makes for great crafting, but may also conjure up images of complex, nearly impossible folding steps. Take the work out of origami. Here's a round-up of 10 fun and easy origami crafts for kids and preschool, most require little or no folding. Have fun and let your creativity go.

1. Origami Food Craft Ideas

2. Origami Money Shirt Craft

3. Origami Turkey Craft

4. Origami Paper Pinwheel Craft Toy

5. Refrigerator Tissue Box Craft

6. Origami Food Pizza Craft

8. Origami Doughnuts(donuts) Craft

9. Fruit Paper Craft

10. Easy Paper Flowers Craft
Preschool Crafts for Kids*

Search this site for even more creative paper crafts.

Friday, May 31, 2013

Father's Day Origami Money Shirt Craft


Here's a creative Father's Day gift idea. Any Dad will love receiving this origami shirt made from real money. Follow the link for the step by step instructions.

How About Orange

Thursday, May 16, 2013

Father's Day Origami T-shirt Cupcake Toppers Craft


This is not only an adorable and fun origami Father's Day craft, but also a great topper for Dad's special cupcake. Simple and fun to make. Go to this great craft site below for the full, step by step tutorial with pictures, including a downloadable template for Father's Day message shirts.

Haniela's

Saturday, October 13, 2012

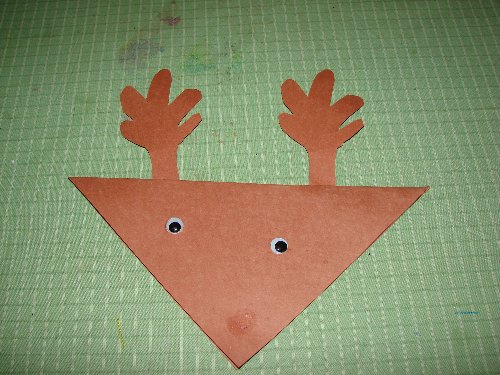
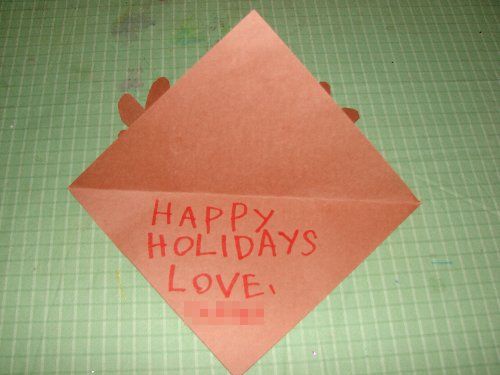
Easy Reindeer Christmas Card Craft for Preschool


Here's a really simple Reindeer Christmas card craft idea from a Japanese site, perfect for preschoolers. This card is also good for teaching about shapes.

Materials:

  • brown construction paper or origami paper
  • scissors
  • google eyes
  • red pom pom (not shown)
  • glue
  • crayon

Directions:

  1. Cut a 6 inch square from brown construction paper. This is standard origami paper size.
  2. Trace and cut little antlers from paper.
  3. Fold your square in half diagonally to make a triangle.
  4. Glue the antlers on the back as shown.
  5. Glue google eyes and a red pom pom nose on the front. The nose on this one came off.
  6. Write a holiday message on the inside with crayon.


Canadian, American Goods

Tuesday, August 14, 2012

Thanksgiving Origami Turkey Craft


Here's a cute Thanksgiving origami turkey craft idea from Craft ideas for all. This simple fan design is easy to make and makes a great table decoration. Visit the site for a full tutorial with pictures. Happy Thanksgiving and gobble, gobble.
Craft Ideas for All

Thursday, August 9, 2012

Origami Paper Pinwheel Toy Craft


This Japanese site has instructions and photos on making an origami paper pinwheel toy craft, great for summer or anytime.

Materials:

  • newspaper ad insert(or thin dowel or skewer)
  • origami paper or colorful paper cut to a 6 inch square
  • plastic drinking straw (a 3/4 inch piece and a 1 inch piece)
  • scissors
  • a toothpick
  • tape
  • glue
  • pushpin

Directions:
  1.  Roll the glossy newspaper ad insert into a thin stick and tape together. Or use a thin dowel or skewer.
  2. Tape the 1 inch straw piece to the top of the stick as shown in the picture.
  3. Insert a toothpick into the straw piece and tape one end so it doesn't come out. You will stick the pinwheel on the opposite side.
  4. For the pinwheel, fold the origami paper in half to make a triangle, unfold, and fold again the other way.
  5. Cut along all 4 fold lines, stopping about 1/2 inch from the center.
  6. Pull down every other corner to the center and glue in place. Make a hole in the middle with a pushpin and stick onto the toothpick.
  7. Make 2 holes through the middle of the 3/4 inch straw piece with a pushpin and stick onto the toothpick to keep the pinwheel in place.
  8. Put a piece of tape over the tip of the toothpick to keep the straw in place.
Yasashi Sekatsu(Gentle Life)

Origami Paper Pinwheel Craft Toy


Here's a great site with English instructions on making an origami paper pinwheel. Use origami or any colorful 5 inch square paper. Follow the link for the full tutorial. A great summer craft toy.

Amy's Favorites

Monday, April 9, 2012

Refrigerator Tissue Box Craft

Here's a cool idea to turn an ordinary tissue box into a refrigerator to hold all your origami or toy food.
Materials:

  • 3 tissue(Kleenex) boxes
  • origami paper or other colorful paper
  • scissors
  • glue

Directions:

  1. On the back of a Kleenex box, cut a 7cm(2.7 inch) flap from the top. Cut it so you can open it like a door.
  2. Leave a little space and cut another 7cm flap.
  3. Leave  little space again and cut a 7 cm flap from the bottom. Cut this one completely off. It will be the vegetable crisper box.
  4. Cut the back off another Kleenex box and fit it inside the first one to make the inside back of the refrigerator.
  5. Glue colorful paper all over the outside of the box.
  6. Cut 2 6x13.5cm rectangles from another tissue box and use them to make the shelves on the inside. Fold up the ends and glue to the inside of the box.
  7. Cut a 7cm box off the end of another tissue box. This will become the crisper drawer. Glue colored paper all over the drawer.
  8. Cover another piece of tissue box with colored paper and cut 1x9cm strips and glue them on for the refrigerator handles. You could also just cut a lip in the drawer and pull it out with your finger.
  9. To make a tight fitting door, cut 2x6cm strips from a tissue box. Fold in the middle lengthwise and glue the flap to the end of the door opening. (not shown)

Monday, February 13, 2012

Origami Food Pizza Craft


Here's a fun and tasty pizza craft idea made from a milk carton, tissue, and origami paper.

Materials:

  • milk carton, washed and cut open and laid out flat
  • origami paper
  • tissue
  • scissors
  • glue

Directions:

  1. On the flat milk carton, trace about 5 inch(12 cm) diameter circle and cut out.
  2. Cut the circle three times to make six pie pieces.
  3. Wrap each pie piece in a 1/4 folded piece of tissue paper and cut off the bottom excess along the curve.
  4. Place each pie piece on a half piece of yellow or tan origami paper. Fold over the curved end first, then fold over and cut off the excess. Glue in place.
  5. Cut and glue on details to your pizza like pepperoni, tomatoes., onions, cheese, or whatever you like. Serve hot on a paper plate.


Origami Fried Chicken Food Craft

These delicious looking fried chicken drumsticks are entirely made of tissue and origami paper.

Materials:

  • tissue(Kleenex)
  • brown and white origami paper
  • tape
  • scissors
  • glue

Directions:

  1. Take 1 tissue and fold into a 1/4 sized square.
  2. Fold in the opposite corners, then fold over the other opposite corners, then roll up into a fat cone shape.Tape to secure.
  3. Take a 4x4 inch(10x10 cm) square of brown origami paper. Put the cone shape in the middle, with the fat end pointing to 1 corner. Fold up the bottom, then the sides and twist the top of the skinny side into a "tail".
  4. Take a 2x2 inch(5x5 cm) square of white or pink origami paper. Fold in half. Cut many small slits along the folded side.
  5. Put glue on white paper, place the brown "tail" on top and roll up to make the drumstick covers.


Origami Food Craft Ideas


Here's a banquet of ideas for using origami paper to make plat food. Everything you see here is just origami paper and tissue. From the top and moving left, you can see:

  1. A Fried Egg- a disk of tissue paper with a yellow origami yolk disk on top.
  2. Chicken Fried Rice- a wad of tissue paper wrapped with orange origami, with three origami sweet peas on top, all on top of a green origami lettuce leaf.
  3. Fried Chicken Drumsticks- tissue paper wrapped in brown origami paper and with a white paper chicken legs.
  4. Rolled Japanese Style Omelet(Tamagoyaki)- a folded and rolled strip of yellow origami paper.
  5. Japanese White Radish(Daikon)- rolled cone piece of tissue, with rolled origami grass top.
  6. Rice Balls(Onigiri)- Rolled Tissue paper wrapped in a thin black strip of black origami paper seaweed(nori).
  7. Hamburger Steak Patty- a disk of tissue wrapped with brown origami paper.

Sunday, February 12, 2012

Origami Fried Egg Food Craft

Here's how to make a fried egg using only tissue and origami paper.

Materials:

  • tissue(Kleenex)
  • yellow origami paper
  • tape
  • glue

Directions:

  1. Take 1 tissue and fold half lengthwise. Then fold into a fried egg white disk shape and tape the back to secure.
  2. Cut another tissue into 4 quarter pieces. Take 1 quarter piece and fold into a small disk. Tape the the back.
  3. Take a 2x2inch(5cm) square of yellow origami paper. Spread with glue and wrap around the small tissue disk to make the fried yolk. Glue to the top of the egg white.

Wednesday, February 8, 2012

Origami Rice Ball (Onigiri) Craft

Here's a simple way to make little Japanese rice balls from tissue and origami paper for your bento lunch.

Materials:

  • tissue(Kleenex)
  • black origami paper
  • tape
  • glue

Directions:

  1. Take 1 tissue and fold in half and then fold in half again to get a 1/4 sized square.
  2. Fold over the square twice into a 1/3 sized, long rectangle.
  3. Roll up the rectangle and secure with a piece of tape.
  4. Put the rolled piece onto another 1/4 sized tissue square near the corner and fold over to make a second layer and secure with tape.
  5. Cut a strip of black origami paper about 1x3.5 inches(2.5x9cm) to make the seaweed(nori) that wraps around the rice ball. Wrap around and glue in place.


Monday, February 6, 2012

Origami White Radish (Daikon) Craft

Japanese white radish or "daikon" is a favorite for stews and other dishes in Japan. Here's a way to make a cute little white radish from tissue paper and a little origami paper to put in your toy produce section. 

Materials:

  • 1 tissue(Kleenex)
  • 1 small sheet of light green origami paper
  • tape
  • scissors

Directions:

  1. Cut the tissue in 4 quarters to make 4 equal squares.
  2. Take 1 quarter square and make a tight, little cone shape. Put a little piece of tape to keep the shape.
  3. Place the cone on 1 more quarter piece of tissue. Line it up on the corner.
  4. Place just a bit of glue on the corners and wrap up your cone. Twist the excess at the top of your daikon into a little tail.
  5. To make the daikon leaves, cut a standard piece or light green origami paper in quarters.
  6. Take one quarter and fold in half.
  7. Use scissors or special craft scissors and make many little zigzags cuts along the open end to make the leaves.
  8. Place the daikon's "tail" on the folded side of the origami paper and secure with a piece of tape. Roll up the tail in the green leaves and secure the outside with tape or a little glue. You're done.


Saturday, February 4, 2012

Origami Cup Craft

Here's an easy way to make toy cups from a toilet paper roll and origami paper.

Materials:

  • toilet paper rolls
  • origami paper
  • scissors
  • glue

Directions:

  1. Cut a toilet paper roll in half.
  2. From another toilet paper roll, cut a ring about a quarter of an inch wide for the handle.
  3. Glue a piece of origami paper around the toilet rolls. Cut off the excess or fold down into the roll.
  4. Cut about a quarter of an inch out of the ring and lay flat.
  5. Glue on origami paper to the handle strip and cut off the excess.
  6. Fold down the ends and glue to the side of the cup.
  7. Trace and cut out a star or heart from a different color and glue to the side of the cup.
  8. For a bottom, trace the end the toilet roll on paper. Cut out and glue to the bottom.


Thursday, February 2, 2012

Origami Milk Carton Craft


Here's another great idea to make food toys from recycled materials. Wash and cut open a milk carton. You can use it to make tiny milk or juice cartons about 3 inches tall to go in your toy refrigerator. You don't need to write in Japanese like my wife did. The sizes I give are the original measurements in cm. You can adjust them to more manageable measurements as you like.
Materials:

  • washed and cut open milk carton
  • origami paper
  • ruler
  • scissors
  • glue
  • white pen or whiteout pen
Directions:
  1. Cut a rectangle from the milk carton 11 cm(4.3 inches) by 7 cm(2.8 inches).
  2. Fold the rectangle every 1 inch down the length to make 4 segments. It's important to leave about a quarter of an inch flap at one end. This is where you'll glue it together.
  3. Fold the carton into a 2.8 tall rectangular box and glue into place with the flap. The printed side should be on the inside of the box.
  4. Push the sides and pinch the top 1 inch of the of the box into the carton top. Glue and/or tape in place to secure.
  5. Cut a 11 cm(4.3 inch) by 4 cm(1.6 inch) rectangle from origami paper for the label.
  6. Glue the paper onto the carton.
  7. Add details like a cow or fruit and write the words "milk" or "juice".
  

Submit your craft! Do you have a great craft tutorial or idea you want to share and reach a wider audience? Visit my Submit page and my new, easy-to-use submission form.

Related Posts Plugin for WordPress, Blogger...