Showing posts with label ice. Show all posts

Friday, December 19, 2014

Easy Polar Bear Tissue Snow Craft


I love arctic animal crafts. Here's a simple polar bear that's great for preschool.

Materials:

  • sheet of light blue construction paper
  • polar bear template cut from white card stock
  • marker
  • scissors
  • glue
  • tissue paper scraps


Directions:

  1. Trace and cut out a simple polar bear.
  2. Draw detail and glue to the center of light blue paper.
  3. Glue on little tissue paper balls for snow.
  4. You could also glue on tissue paper at the bottom for ground.


Sea Arctic Animals Craft


If you're doing a theme on sea life or arctic animals, here's a great idea with a seal, fish, and floating ice.

Materials:

  • Various colored construction paper
  • scissors
  • glue
  • marker
  • Styrofoam scraps


Directions:

  1. Cut out a simple seal head from purple paper and a fish from grey, cut in half.
  2. Cut out some waves from grey, too.
  3. Draw details on the seal and fish.
  4. Glue al the pieces on a sheet of light blue construction paper for the ocean.
  5. Glue on some broken Styrofoam pieces for floating ice.


Friday, March 14, 2014

Mother's Day Ice Cream Cone Card Craft

28 Simple Mother's Day Gift Ideas and Crafts - Teach Junkie

Here's a really sweet Mother's Day craft idea. Follow the link for the free printable template for this Mother's Day ice cream cone card. Put the message, "My Mother is the sweetest!". Mom will love it.

Teachers Pay Teachers

Tuesday, April 23, 2013

Mother's Day Ice Cream Cone Card Craft


This ice cream cone filled with all the reasons you love mom is a great Mother's Day card craft idea. "I love you with a cherry on top." Follow the link for the full tutorial.

A Cupcake for the Teacher

Thursday, March 28, 2013

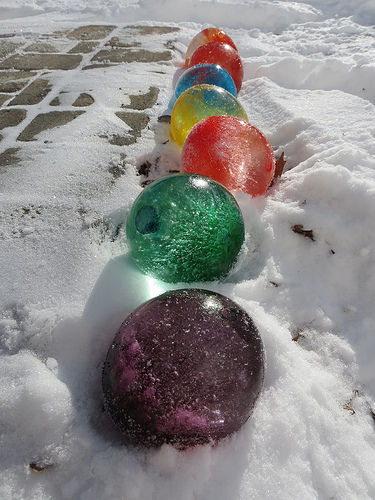
Ice Marbles Craft Game


I just love this idea from The Queen Says. Use colored water and balloons and freeze them into giant ice marbles. Take them outside on a hard, flat surface and play a real game of marbles. So much fun. I think this could be equally fun in Winter or Summer.

The Queen Says

Wednesday, October 3, 2012

Craft Sticks Snowflakes Craft


I love these craft stick snowflakes from Mrs. Karen's Preschool Ideas site. 4 Craft sticks glued together and then covered in Epsom salt. Follow the link for this as well as many other great ice and winter related craft ideas.

Mrs. Karen's Preschool Ideas


Friday, August 3, 2012

Summer Ice Balloon Experiment


This is a simple summer activity you can do at home or with a class. For older kids, it helps them understand that water has different phases or forms. For younger kids, it's just cool summer fun.


Materials:

  • balloons
  • water
  • small beads or toys
  • a freezer
  • scissors

Directions:
  1. Drop a few colorful beads(beach animal shaped ones are good) or small toys into a balloon.
  2. Fill the balloon with water and put in the freezer overnight. (You could also used colored water)
  3. Cut the balloon and take out the ice ball. The students can see something inside.
  4. Let them play with it on a tray or put in the wadding pool.
  5. As the the ice melts, the beads come out.
  6. You could give them as party favors and let kids take home the toys inside.

Friday, May 4, 2012

Ribbon Ice Cream Cone Craft

Here's a cool ice cream craft for summer using paper and ribbon

Materials:
  • thick brown paper
  • pink paper
  • various pink ribbon
  • red button
  • scissors
  • glue

Directions:

  1. Roll the brown paper into a cone and glue in place. Cut the top to make it flat.
  2. Cut about 9 pieces of ribbon into 2-3 inch strips.
  3. Arrange the ribbon pieces like a star shape with all ends meeting in the middle. Staple or glue all the ends together.
  4. Crumple a piece of pink paper into a ball and place on the ribbon star. Fold up the ends around the paper ball and glue or staple at the top to make your scoop of ice cream.
  5. Glue a red ribbon on the top for a cherry.
  6. Pipe glue around the top of the ice cream cone and put on your scoop of ice cream. Allow to dry.

Pom Pom Ice Cream Craft

These are cute little ice cream cones you can make with pom poms. The best part is they'll never melt.

Materials:
  • 1/2 sheet of brown construction paper
  • scissors
  • white glue
  • pastel color pom poms
  • small colorful beads

Directions:
  1. Roll the construction paper into a cone. Glue or tape secure.
  2. Use scissors to cut a flat end to the top.
  3. Pipe white glue around the top and put on the pom pom. Make a double or triple scoop if you like.
  4. Dip colorful beads into white glue and apply for sprinkles.
source: Kaboose

Ice Cream Paper Craft

Here's a very easy ice cream craft to do with the kids.

Materials:

  • white card stock(or other color)
  • brown paper
  • scissors
  • glue
  • crayons
  • ice cream sprinkles

Directions:

  1. Trace and cut out a simple ice cream shape from card stock and cone from brown paper.
  2. Glue the ice cream on top of the cone.
  3. Decorate the ice cream with spots or stripes.
  4. Decorate your cone with criss crossing brown lines.
  5. Apply glue and add real ice cream sprinkles on top.


source: Little Family Fun

Saturday, February 4, 2012

Ice Lantern Craft

This ice lantern is more of a science experiment than a craft. Great for a unit on winter or science about water or ice. Making it requires outside temperatures well below freezing or a really big freezer. This is something commonly done for party decorations in Scandanavia. People make a lot of them and line the driveway to the house.

Materials:

  • bucket
  • water
  • a candle
  • freezing temperatures

Directions:

  1. On a freezing night, fill a bucket with water and set our overnight. It might take more than a day to freeze.
  2. Turn the bucket over and dump out. The The top of the bucket and the sides will be frozen, but the bottom and middle will still be water.
  3. Dump out the water and insert a lighted candle. Watch your crystal lantern glow.

Sunday, January 29, 2012

Ducks on Ice Winter Craft

Here's a cute winter craft. It uses glitter and Saran wrap to simulate ice complete with little ducks.

Materials:

  • dark blue construction paper
  • glitter
  • glue
  • scissors
  • white paper with little ducks
  • Saran wrap

Directions:

  1. Find a duck template from a coloring page or draw your own. Reproduce and cut out many small ducks.
  2. Color the ducks feet and draw an eye.
  3. Draw a pond shape from dark blue paper and cut out.
  4. Cover the blue pond with glue and sprinkle on glitter or use glitter glue.
  5. Wrap the whole pond with Saran wrap and glue on the back.
  6. Glue three little ducks walking on the ice.

Tuesday, January 3, 2012

Icicle Bulletn Board Craft

Here's a simple way to make an icicle border trim for your bulletin board.

Materials:

  • 2 pieces of 12" x 9" white tissue paper
  • 1 piece of 12" x 9" aluminum foil
  • glitter
  • soft pencil
  • scissors
  • glue

Directions:

  1. Lay one piece of tissue paper on a desk, then a layer of aluminum foil, then the other piece of white tissue paper on top. Line up the edges.
  2. Use a soft pencil, to carefully draw a row of jagged icicles across the top tissue paper.
  3. Cut out the icicles through all three layers.
  4. Pull the bottom 2 layers down a little so they can be seen hanging just below the top layer of tissue paper.
  5. Glue the three layers in position and allow to dry.
  6. Dab glue on the tips of the icicles and add glitter.
  7. Repeat and display on the bulletin board.

3D Arctic Ice Craft

Here's a cool 3D idea that simulates an arctic ice flow breaking up.

Materials:

  • 1 sheet of white construction paper
  • Styrofoam scraps
  • blue tempura paint
  • sponge
  • scissors
  • glue

Directions:

  1. Beforehand, for each child, cut the white construction paper so it measures 9 inches at the top and 12 inches at the bottom. This creates a depth perception effect.
  2. Talk about the polar ice caps and show the students pictures.
  3. Lightly sponge blue paint all over the paper.
  4. Cut Styrofoam scraps into different-sized jagged pieces.
  5. Glue the Styrofoam pieces on the paper. Place the biggest pieces close together at the top and space out the smaller pieces as you work your way down the paper. It creates an image of ice breaking up and floating out to sea.

Submit your craft! Do you have a great craft tutorial or idea you want to share and reach a wider audience? Visit my Submit page and my new, easy-to-use submission form.

Related Posts Plugin for WordPress, Blogger...