Showing posts with label fruit. Show all posts

Saturday, December 20, 2014

Cherry Tree Collage Craft


Here's a simple cherry tree craft for spring or anytime. 

Materials:

  • Various colored construction paper
  • red paint
  • scissors
  • glue
  • large Q-tips


Directions:

  1. Beforehand cut several simple leaves from green paper.
  2. Tear one large and several smaller strips of brown paper. Glue the pieces to make a tree on a sheet of yellow paper.
  3. Glue on the leaves.
  4. Bind two or three large Q-tips together to make cherry shapes. Dip in red paint and dab on the cherries.

Sunday, November 30, 2014

Paper Plate Collage Apple Craft


Here's a simple apple craft to do with your preschoolers or little ones.


Materials:

  • Paper plate
  • Red construction paper torn into little pieces
  • A little brown and green construction paper
  • Scissors
  • Pencil or crayon
  • Glue


Directions:

  1. Beforehand cut a little notch in the paper plate to resemble an apple.
  2. Spread glue all over the front of the paper plate and cover in the red paper pieces.
  3. Cut a little stem from brown paper and glue to the back.
  4. Cut a green leaf and glue on the top.
  5. Cut a little worm from green paper and glue on the front and draw a smiley face. You could partially cover the worm with red paper to make it look like he’s coming out of a hole.

Saturday, July 26, 2014

Healthy Halloween Fruit Snacks


Here's a creative and healthy food idea for your Halloween party. Use peeled oranges and celery stalks for pumpkins, and bananas for ghosts. You could use chocolate chips for the eyes and mini Oreo circles for moths. Follow the link below for even more inspiration.

Home Decor Catalog

Monday, April 28, 2014

Father's Day Preschool Watermelon Card Craft


I really like this cute Father's Day card craft. Make a watermelon with the funny message, "You're one in a Melon!". This is a perfect preschool or kindergarten craft. Visit the site below for the tutorial on this simple and cute idea.

Preschool Learning and Crafts

Sunday, February 16, 2014

Easy Felt Carrots Easter Garland Craft

Easy Felt Carrot Garland Easter Craft :: PositivelySplendid.com

Here's a simple and creative idea to make felt carrot garland for Easter. The carrots also double as hearts. Make Pink ones for Valentine's Day. Follow the link to the great site below for the complete tutorial. This craft is Positively Splendid!

Positively Splendid

Sunday, August 5, 2012

Halloween Paper Strip Pumpkin Craft


Here's a super easy and cute Halloween paper strip pumpkin craft from Linda at Little Family Fun. It's pretty self-explanatory. Staple or glue paper strips into rolls and glue on a sheet of card stock to make a pumpkin. Visit this site for this and lots of other great craft ideas.

Little Family Fun

Monday, July 30, 2012

Halloween Paper Strip Pumpkin Craft


This s a really cute Halloween paper strip pumpkin craft. You can use zigzag craft scissors or regular scissors. Follow the link for a complete tutorial with step by step instructions, along with dozens of other great craft ideas.
a-z learning bug

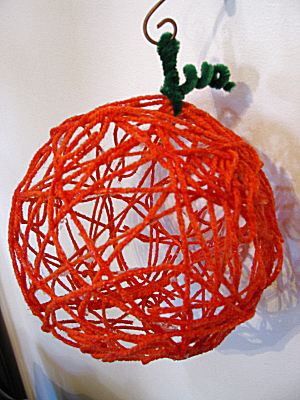
Halloween Yarn Pumpkin Craft


This Halloween yarn pumpkin craft idea is a classic. Simple and fun to make. Just yarn, a ballooon and glue. I've seen the same idea used to make a spider's web craft, too. Follow the link for a full tutorial with pictures.

Naturally Educational

Monday, July 23, 2012

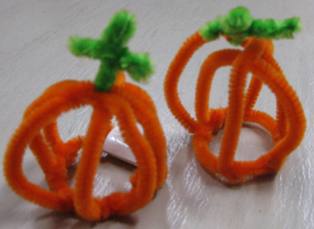
Pipe Cleaner Halloween Pumpkins


Here are some cute Halloween pip cleaner pumpkins from a Japanese site. Make a loop at the end of an orange pipe cleaner to make the base. Wrap the free end over the top to make the first loop in your pumpkin. Add 2 more short pipe cleaners for the other loops. Add a short green pipe cleaner at the top for the stem.


Nishigako Kids

Monday, June 25, 2012

Paper Apple Craft

This paper apple craft is another variation of the recycled book pumpkin craft from Craftberry Bush. This one you don't need a book, but several sheets of white paper.

Materials:

  • cardboard
  • white paper
  • scissors
  • short stick
  • strong stapler
  • glue or glue gun
  • red food coloring
  • water
  • shallow bowl
  • ribbon
  • apple seeds

Directions:

  1. Trace a simple half apple shape with one straight edge on cardboard and cut out. This will be your template.
  2. Put several sheets of  white paper together. Fold in half and staple the fold to make a book.
  3. Place the template on your little book with the straight edge along the spine and trace with a pencil.
  4. Cut out with scissors.
  5. Mix red food coloring with water in a shallow bowl.
  6. Close your book and tip the edges in the red water to dy them. Allow to dry.
  7. Glue a short stick to the spine of your book, sticking up a little from the top. Prefereably one with a little gren leaf.
  8. Fold some pges arount the stick and glue in place. Hold with a clothespin until dry.
  9. Tie a little ribbon around the stem.
  10. Glue or draw a couple of apple seeds on the inside of your book.
  11. Display your paper apple.


Source: Craftberry Bush

Recycled Book Pumpkin Craft

This recycled book pumpkin craft has a really cool, vintage look. A very unique decorative craft for Earth Day, fall, Halloween, or anytime.

Materials:

  • old paperback book
  • cardboard
  • scissors
  • ribbon
  • stick
  • exacto knife
  • glue gun
  • tea bag
  • clothespin


Directions:

  1. Cut a simple half pumpkin/apple shape with one straight side from cardboard for your template.
  2. Remove the cover from the book.
  3. Close the book and place your template on the book with the flat side even with the book's spine. Trace or simply hold in place and cut allong the lines with an exacto knife. You have to keep cutting through again and again until you reach the end of the book.
  4. Trim the edges with scissors.
  5. Brew some tea. Use the wet tea bag to stain the edges of the book pages.
  6. Place a short stick along the spine of the book sticking up a little from the top. Hot glue in place.
  7. Fold some pages around the stick and glue in place. Use a closepin to close and keep in place until dry.
  8. Tie a ribbon atound the stem. Display your recycled book pumpkin.


Source: Craftberry Bush

Friday, June 22, 2012

Fall Pumpkin Sun Catcher Craft


This Halloween Pumpkin Sun Catcher Craft will look great hanging in the window during Halloween or anytime.

Materials:

  • pumpkin template from site below
  • yellow and orange tissue paper
  • black construction paper
  • scissors
  • contact paper
  • pencil
  • yarn
  • glue

Directions:

  1. Cut the tissue paper into 1 inch squares.
  2. Fold back the backing of the contact paper. Put on the tissue paper squares in a 8 inch circle. Leave no gaps.
  3. Fold over the backing and smooth out any bubbles.
  4. Print and cut out the pumpkin template. Trace and cut out 2 pumpkins from black paper.
  5. Lay the template over the contact paper you decorated and trace the pumpkin shape. Cut out the shape slightly smaller than the line.
  6. Glue the contact on top of one pumpkin.
  7. Loop the yarn and glue to the top of the contact paper sticking out the top.
  8. Glue and sandwich the other pumpkin on top.
  9. Hang up your pumpkin in a window.

Source: The Crafty Hostess

Sunday, June 17, 2012

Easy Paper Plate Apple Craft


This is an easy and fun apple craft you can make from a paper plate.

Materials:

  • paper plate
  • red paint and paintbrushes
  • brown and green construction paper
  • scissors
  • apple seeds
  • glue

Directions:

  1. Paint the bottom of a paper plate all red and allow to dry.
  2. Cut out a brown stem and 2 green leaves from construction paper and glue to the back of the plate.
  3. Glue real apple seeds in the middle of the plate.

Variations:

  1. Instead of paint, glue on scraps of red paper or tissue paper.
  2. Cut a little dip at the top and bottom to make a more apple shape.
  3. Paint the rim red and the middle yellow to make an apple cut in half.


Source: Crafts for Preschool Kids

Sunday, May 20, 2012

Mother's Day Apple Card Craft


Here's a cute Mother's Day Apple card craft my daughter made. You can glue the messages on the apples beforehand.

Materials:

  • apple template
  • red, brown and green construction paper
  • white paper
  • scissors
  • yarn
  • hole punch
  • glue

Directions:

  1. Find a good, simple apple template online. Print and trace and cut out 2 apples fro this craft from red paper.
  2. Trace and cut a simple stem from brown and a simple leaf from green.
  3. Type and print out the messages, "Happy Mother's Day" and "Thank you, I love you" on white paper.
  4. Cut out the messages and glue one on each apple.
  5. Glue the leaf and stem on the "Happy Mother's Day" apple.
  6. Have students trace and/or color the messages. Older students could just write them.
  7. Put the apple one on top of the other and punch 2 holes near the top.
  8. Tie a short length of yarn through the holes to complete your card.
  9. Don't forget to write your name.


Monday, April 16, 2012

St. Patrick's Day Apple Print Shamrock Craft

Here's a great St. Patrick's Day shamrock craft idea using apple prints and green paint.

Materials:

  • 1 apple
  • sharp knife
  • green paint in a shallow dish
  • paintbrush
  • yellow or other colored paper

Directions:

  1. Cut an apple in half with a knife.
  2. Dip the half apple in green paint.
  3. Make 3 papple prints in the shape of a shamrock as shown.
  4. Use a brush or finger to draw a stem. Allow to dry.


Source: Tip Junkie


Sunday, March 18, 2012

Paper Plate Roller Car Toy Craft

This is an easy and fun toy craft my daughter brought home from her Japanese elementary school. It's a roller car made from paper plates and paper cups. This one has fruit and flower themes in the middle and Halloween characters on the ends, but any theme will do.

Materials:
  • 2 paper plates
  • 2 paper cups
  • tape
  • glue
  • paper
  • markers
  • ribbon
  • other decorating materials

Directions:

  1. Tape 2 paper cups together at the bottoms.
  2. Decorate your cups directly or draw shapes and cut and paste on.
  3. Decorate your paper plates.
  4. Glue 1 paper plate on either end of the cups. Allow to dry.
  5. If desired, tape 3 curled strips from thick paper to the middle. They will make a flapping sound on the floor when you roll your car.
  6. Have races with your friends y pushing with your hands or blowing.


Summer Watermelon Paper Plate Craft

This is a very easy Summer watermelon craft made from a paper plate. This is easy enough for the youngest students.

Materials

  • paper plate
  • markers

Directions:

  1. Color the inside of a paper plate red with a marker.
  2. Color the rim green.
  3. Add black dots in the middle for seeds.
  4. Fold in half to make your slice of watermelon.

Friday, March 2, 2012

Fruit Mask Balloon Craft

This is a kind of odd craft my daughter brought home from her Japanese elementary school. It's a fruit mask that has inflatable parts. The concept was using a plastic bag or glove and straws to make a hidden inflatable effect. The long one is a disposable umbrella baggy that's common in Japan. This Fruit mask was the end result, but you could make it any theme.

Materials:

  • piece of colored construction paper or card stock
  • 5x1.5 inch rectangle from card stock or construction paper
  • plastic glove
  • plastic bag, preferably a long skinny one
  • 2 bendable straws
  • tape
  • markers
  • scissors or box cutter

Directions:

  1. Fold the sheet of card stock in half and open again. Glue the small rectangle in the center of the sheet on the back side.
  2. Cut a small rectangle near the top for a window and a small hole near the bottom for the straw to go through.
  3. Flatten your plastic glove and bag and draw on colorful fruit, animals, or other themes with markers.
  4. Decorate the front of the card stock with markers.
  5. Insert one straw through the small hole and tape the other to the rectangle. Tape together at the bottom.
  6. Tape the plastic glove and bag over the ends or the straws so they are airtight.
  7. Hold the mask up to your face and blow through the straws.


Monday, February 6, 2012

Origami White Radish (Daikon) Craft

Japanese white radish or "daikon" is a favorite for stews and other dishes in Japan. Here's a way to make a cute little white radish from tissue paper and a little origami paper to put in your toy produce section. 

Materials:

  • 1 tissue(Kleenex)
  • 1 small sheet of light green origami paper
  • tape
  • scissors

Directions:

  1. Cut the tissue in 4 quarters to make 4 equal squares.
  2. Take 1 quarter square and make a tight, little cone shape. Put a little piece of tape to keep the shape.
  3. Place the cone on 1 more quarter piece of tissue. Line it up on the corner.
  4. Place just a bit of glue on the corners and wrap up your cone. Twist the excess at the top of your daikon into a little tail.
  5. To make the daikon leaves, cut a standard piece or light green origami paper in quarters.
  6. Take one quarter and fold in half.
  7. Use scissors or special craft scissors and make many little zigzags cuts along the open end to make the leaves.
  8. Place the daikon's "tail" on the folded side of the origami paper and secure with a piece of tape. Roll up the tail in the green leaves and secure the outside with tape or a little glue. You're done.


Tuesday, November 15, 2011

Fruit Paper Plate Craft

Here's a really easy fruit plate craft for the youngest students.

Materials:

  • paper plate
  • fruit cut outs, apple, orange, grapes, and banana from construction paper
  • glue
  • hole punch
  • string
Directions:

  1. Pre-cut a hole at the top of each paper plate beforehand and tie a string through the hole.
  2. Give each child a paper plate and fruit to glue on.
  3. After they finish, they can wear their fruit plate.


Submit your craft! Do you have a great craft tutorial or idea you want to share and reach a wider audience? Visit my Submit page and my new, easy-to-use submission form.

Related Posts Plugin for WordPress, Blogger...