Monday, July 30, 2012

Halloween Haunted House Window Silhouettes


These Halloween haunted house window silhouettes are a great idea. The ones pictured here came from a punch out kit, Spooky Halloween Silhouettes by Jeffery Rudell. However, you could easily do the same thing yourself. Tape several sheets of black paper together. Draw your design, cut out, and tape to the window. Make them as scary or fun as you like. Cats, bats, pumpkins are all good ideas. It'll really set the mood for your Halloween haunted house.

Laughing Squid

Halloween Milk Jug Skeleton Craft


Believe it or not, this entire Halloween skeleton craft is made from milk jugs. Spook the neighbors with this great looking skeleton hanging in the corner. It's a cheap addition to your Halloween decorations. A good recycled craft, too. Follow the link for more details and a link to the full tutorial and templates. Happy Halloween.

CRAFT website

Photo Jim Watters

Halloween Paper Bag Flashlight Lantern Craft


This Halloween flashlight paper bag Jack-O-Lantern light craft is so cool. It's pretty self explanatory The Artists Helping Children website has so many creative crafts for kids. Follow the link for a fully illustrated tutorial and other great ideas. Take this light on your trick-or-treating route.

Artists Helping Children

Halloween Jack-O-Lantern Stick Puzzle Craft


This is a great Halloween Jack-O-Lantern puzzle craft you can make from craft sticks. I've seen these Popsicle stick puzzles made with photos or other designs. These are so cute and fun to make. Tape the sticks together with masking tape and draw the pumpkin face. Of course, you can make other Halloween character designs, too. Check out the link  below for this and other great craft ideas.

It's not all Mary Poppins

Halloween Paper Strip Pumpkin Craft


This s a really cute Halloween paper strip pumpkin craft. You can use zigzag craft scissors or regular scissors. Follow the link for a complete tutorial with step by step instructions, along with dozens of other great craft ideas.
a-z learning bug

Halloween Tree Craft


This is a wonderful Halloween tree decoration from Vickie Howell at Craft Apparent. Just a branch, black paint, florists foam, candy corn, and a few other things  to make this great looking centerpiece. Follow the link below for a full tutorial. Great idea, thanks Vickie. Be warned, if you visit the site, you may never leave for all the great ideas.

Craft Apparent

Halloween Yarn Pumpkin Craft


This Halloween yarn pumpkin craft idea is a classic. Simple and fun to make. Just yarn, a ballooon and glue. I've seen the same idea used to make a spider's web craft, too. Follow the link for a full tutorial with pictures.

Naturally Educational

Halloween Foam Cauldron Craft


I just love this Halloween Cauldron idea. Use insulation spray foam to make this witch's brew  with bugs for your Halloween display. Follow the link for a full tutorial. Great idea.

All About Me

Sunday, July 29, 2012

Halloween Rice Spider Web Craft


This is a great Halloween Spider web craft idea using lines of glue and raw rice. Follow the link for the full directions.
Thrifty Fun

Halloween Spider Handprint Puppet Craft


I found this great video tutorial on how to make these cute Halloween spider handprint puppets. Great idea. Easy to make.


Halloween Cheese Cloth Ghosts Craft


Here's a great Halloween ghost craft idea. You need cheese cloth, starch, and a ball. Follow the link for the full tutorial.

Honorable Mention Blog

Halloween Jack-O-Lantern Paper Lantern Craft

Here's an easy Halloween Jack-O-Lantern Paper Lantern Craft idea from Japan. Simple and fun to make.

Materials:
  • sheet of orange paper
  • black marker
  • scissors
  • ruler
  • craft knife
  • tea light candle
  • glue

Directions:

  1. Fold your sheet of orange paper in half to find the middle line.  Draw a pumpkin and Jack-O-Lantern face in the middle of the sheet of orange paper with a black marker near the bottom.
  2. Cut out the face parts with a craft knife.
  3. Cut the sides of the pumpkin so it stands out from the rest of the paper.
  4. Roil the paper into a tube and glue in the back.
  5. Cut a light inside and glow.

Eigo Town.com Blog

Halloween Pumpkin Lantern Craft


Here's a really simple Halloween Jack-O-Lantern Pumpkin lantern craft idea from Japan.
The example pictured here used a kind of colored corrugated cardboard or plastic, but you could easily use orange card stock. Follow the link for a full picture tutorial complete with cute kids.

Materials:

  • orange colored corrugated cardboard or card stock
  • green felt
  • scissors
  • black marker
  • tape
  • craft knife (adult only)
  • tea light candle
  • stapler

Directions:

  1. Cut a piece of orange cardboard or card stock about 12 x 5 inches.
  2. Draw a Jack-O-Lantern face in the middle with a black marker.
  3. Have an adult cut out the face with a craft knife.
  4. Round off the top corners with scissors so it has a nice round pumpkin shape. The back should be about 1 inch wide.
  5. Roll into a tube and staple or glue in the back.
  6. Cut a green triangle from felt or paper and tape to the top for a leaf.
  7. Cut a  tea light candle in the back and let your little Jack-O-Lantern shine.
MITTE Kids

Friday, July 27, 2012

Paper Beads Recycled Craft

This is  a super simple recycled craft that's great for Earth Day or anytime.

Materials:

  • old magazines or glossy newspaper ads.
  • scissors
  • glue stick
  • yarn or string
  • a pencil

Directions:
  • Cut strips out of old magazines or newspapers about 1 inch wide and 4 inches long. Cut as many strips as you want beads.
  • Cover the top half of one strip with glue.
  • Start at the bottom and roll the strip on a pencil all the way to the top into a tiny tube bead. Slip the bead off the pencil. Repeat as many times as necessary.
  • String the beads on a length of yarn or string, tie and make a colorful bead necklace.

Halloween Footprint Ghost Craft


These are great looking footprint ghosts from Japan. They are so simple to make.

Materials:

  • black construction paper
  • white paint
  • paint brush
  • google eyes
  • glue
  • feather(optional)

Directions:

  1. Paint the bottom of child's foot with white paint.
  2. Press onto black paper. Allow to dry.
  3. Glue on a couple of google eyes.
  4. Add a colorful feather for accent.


Villa Villekulla

Easy Halloween Jack-O-Lantern Craft


Here's an easy Halloween Jack-O-Lantern craft activity. This is greart for preschool students or very young children.

Materials:
  • blank pumpkin coloring page
  • orange crayons
  • scissors
  • black construction paper
  • glue

Directions:
  1. Find a blank pumpkin coloring page from the internet and give to the child.
  2. Let them color the pumpkin orange.
  3. Pre-cut Jack-O-lantern eyes, nose, and mouth from black paper, or let children try.
  4. Glue the face pieces on the pumpkin.
Kangaroo Days

Halloween Newspaper Skeleton Craft


Here's a great Halloween craft concept from Japan. It's a recycled  newspaper skeleton craft. Roll up old newspapers into thin tubes. Then bend them and make the parts of a skeleton.  Let everyone get creative. Afterward, glue the pieces together or pin your skeleton piece by piece on the bulletin board.

saya saya*

Monday, July 23, 2012

Halloween Milk Carton Treat Bag


Here's a cute Halloween Treat bag craft idea from Japan. Use a recycled milk carton to make this bag.

  1. Tape the top of the milk carton to make it flat.
  2. Cut a door on the side of the milk carton lengthwise. You may need an adult for this.
  3. Tape a length of colorful cord or string for a handle.
  4. Cover the outside with white paper.
  5. Decorate with Halloween characters.

Yumiublog

Halloween Jack-Lantern Treat Bags Craft


Here are some adorable Halloween treat bags from Japan.

  1. Completely cover a small box or gift bag in orange paper.
  2. Cut out black shapes or the eyes, nose, and mouth and a small green shape for the stem and glue on.
  3. Cut a long strip of orange paper and glue or staple to either side for the handle.

Hi-Five Kids

Pipe Cleaner Halloween Pumpkins


Here are some cute Halloween pip cleaner pumpkins from a Japanese site. Make a loop at the end of an orange pipe cleaner to make the base. Wrap the free end over the top to make the first loop in your pumpkin. Add 2 more short pipe cleaners for the other loops. Add a short green pipe cleaner at the top for the stem.


Nishigako Kids

Hallowen Haunted House Treat Bag Craft


This is a cute Halloween craft idea from Japan. Use recycled milk cartons to make little haunted house treat bags.

  1. Cut the milk carton about halfway down.
  2. Cut the sides in a upside down "V" shape so it looks like a house.
  3. Cover in black and orange tape or paper.
  4. Cut 2 strips from milk carton and and cover in black paper. Attach to the sides with tape or a stapler. These will become the handle.
  5. Cut a black rectangle for the roof. Make 2 slits and put on top through the strips.
  6. Tape the 2 strips at the top to form the handle.
  7. Decorate your roof and house with cute Halloween characters or vocabulary.
  8. Lift the roof to fill with candy.

Nishigako Kids

Halloween Jar Lanterns Craft


These are great looking Halloween Lantern Jars. Just glue on orange tissue paper squares, then cut out and glue on eyes, nose, and mouth to make your Jack-O-Lantern and put a candle inside. Or make a black cat.

RoomNico

Winter Penguin Craft


Here's a simple and cute penguin craft. Wrap a toilet paper roll in black paper or just roll black paper into a short tube. Cut out an oval for the tummy, orange feet and beak, yellow eyes, and black flippers and glue the pieces on and dot the eyes. That's it. Great preschool winter craft idea.

Baby Scrapbook

Sunday, July 22, 2012

Summer Aquarium Fish Craft


Here's a cool Summer aquarium fish craft. You can watch your paper fish swim in their little aquarium world.

Materials:

  • sheet of blue and white construction paper
  • other various colors of construction paper
  • cardboard
  • plastic wrap
  • scissors
  • glue
  • crayons
  • hole punch
  • blue thread

Directions:

  1. Apply glue to the border of a sheet of blue construction paper and cover with a sheet of plastic wrap. Cut off the excess.
  2. Cut a border frame for your blue sheet from cardboard and a matching frame from white construction paper.
  3. Glue the cardboard frame on your blue paper.
  4. Cut colorful fish from geometric shapes and punch a hole in each. Tie to a short length of blue thread.
  5. Cut out green paper water plants.
  6. Tape the threaded fish to the top of the frame and glue the plants to the bottom.
  7. Glue the white paper frame on top of the cardboard frame.
  8. Decorate the white frame with crayons.
  9. Stand your aquarium up and see the fish floating.


Summer Collage Craft


Here's an easy and fun summer collage craft.

Materials:
  • white card stock
  • old magazines
  • scissors
  • glue
  • crayons

Directions:

  1. Draw a sun in the middle of your sheet of card stock.
  2. Cut out summer related pictures from old magazines; pools, the beach, swimwear, fireworks, ice cream, summer foods, etc.
  3. Glue your pictures on the paper.

Teddy Bear Puppet Craft


This is a simple Teddy bear puppet craft you can do with any class. This is a fun activity to teach about animals or body parts.

Materials:

  • bear template
  • colorful construction paper
  • craft sticks
  • tape
  • scissors
  • brass fasteners/butterfly clips(optional)

Directions:

  1. Find a cute and simple teddy bear puppet template or other coloring page.
  2. Print out teddy bear on colorful paper.
  3. Cut out the bears body parts or let students do that.
  4. Glue the pieces together.
  5. Tape a craft stick to the back for your puppet.
Variation:
Punch holes and use brass fasteners/butterfly clips to put the body parts together and your bear can move.

Sunflower Seeds Paper Plate Flower Craft


Here's a pretty sunflower craft using real seeds and a paper plate.

Materials:

  • paper plate
  • sunflower seeds
  • yellow construction paper
  • pencil
  • scissors
  • white craft glue

Directions:

  1. Pour glue all over the center of a paper plate and cover with sunflower seeds. Allow to dry.
  2. Pre-cut simple petal shapes from yellow paper or let students cut them out.
  3. Glue the petals around the rim of the paper plate.

Variation:
Cut out eyes, nose, and a mouth and glue on a face.


Summer Folding Fan Craft


This is a simple summer folding fan craft idea. Great to beat away the heat.

Materials:

  • white construction paper
  • crayons/paints
  • colorful carpet tape or other thick tape

Directions:

  1. Completely color a sheet of white construction paper. You can use crayons or paints. Use summer theme motifs, the more colorful, the better.
  2. Accordion fold the paper lengthwise.
  3. Tape one end with colorful tape.
  4. Unfold and fan yourself.

Halloween Secret Door Haunted House Craft


Here's an easy and fun way to make a Halloween haunted house craft. This idea comes from my daughter's Japanese elementary school craft project using a craft knife to make little doors and windows in paper. Should only be done under adult supervision.

Materials:

  • black card stock or thick paper
  • colorful paper
  • scissors
  • glue
  • crayons
  • pencil
  • craft knife
  • cutting surface

Directions:
  1. Draw doors and windows on the black paper using simple geometric shapes.
  2. Place paper on the cutting surface and use your craft knife to cut the secret doors and windows leaving the hinges in place.
  3. Cut pieces of colorful paper to fit behind each door and glue in place.
  4. Draw a scary ghost or monster hiding behind each door. Boo!

Secret Door House Craft


Here's a cute craft my daughter did. They were teaching 2nd graders how to use a small craft knife like a box cutter in her Japanese elementary school. Only do this under adult supervision. Use it to make a secret door and window house. It really lets kids imagination grow.

Materials:

  • sheet of white card stock
  • colored paper
  • crayons
  • scissors
  • glue
  • craft knife
  • cutting surface.

Directions:

  1. Put your white card on your cutting surface.
  2. Draw door or window shapes that can open.
  3. Carefully cut the shapes with your craft knife, leaving one side for the hinge.
  4. Cut pieces of colorful paper big enough to fit behind each door, window and glue in place.
  5. Open the doors and draw a little picture behind each.

Use the same concept to make your own advent calender.

Summer Jellyfish Plastic Plate Craft


Here's a summer jellyfish craft idea from Japan. Use green plastic plate or paint a paper plate green.

Materials:

  • green plastic plate/ painted paper plate
  • scissors and craft scissors
  • green crepe streamers
  • light green construction paper
  • markers/crayons
  • hole punch
  • string
  • glue

Directions:

  1. Cut your green plate in half using zigzag craft scissors.
  2. Cut a half circle to fit on the bottom of the plate. Draw a jellyfish face with eyes and spots.
  3. Glue the face on the bottom of the half plate.
  4. Cut long crepe streamers of equal length and glue on the opposite side of the plate for tentacles.
  5. Punch a hole in the top and tie a string to hang up.

Thanks: Baby Scrapbooks

Halloween Jack-O-Lantern Treat Bag Craft


Here's a simple Halloween Jack-O-Lantern treat bag craft idea from Japan. Simple and easy for preschool students.

Materials:

  • orange and black construction paper
  • scissors
  • glue
  • stapler

Directions:
  1. Fold a piece of orange paper in half and trace and cut out 2 identical pumpkin shapes.
  2. Cut out eyes, nose, and mouth from black paper and glue on one pumpkin.
  3. Glue and/or staple the edges of the pumpkins together, leaving the top open like a pocket.
  4. Cut a thick black strip and staple for a handle.
  5. Take your bag trick-or-treating and fill with candy.


Thanks: Learn English Blog

Sunday, July 15, 2012

Pop Pop "Ponyo" Boat Craft


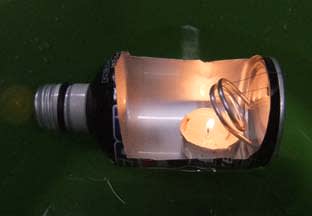
I first saw the idea for this toy boat in the Japanese animated movie, "Ponyo".  I found that actually this "Pop pop" or "Putt Putt" boat toy dates back about one hundred years. The picture above most clearly illustrates the concept for the boat. The candle heats the water in the tube. It turns to stream and gushes out both ends, which creates a vacuum, that quickly sucks water back through both ends and the cycle repeats. The one in the movie and most toy versions use a flattened diaphragm boiler. Which creates more of a putt putt sound and is a little stronger. But the home made coil version works well, too.

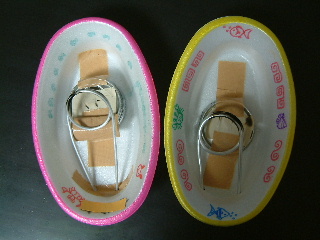
Take some thin copper or aluminum tubing which usually comes in 12 inch lengths. Wrap around a dowel or battery and make 2 or 3 coils. 3/32 inch or 1/8 inch size tubing are recommended. Attach the motor to your boat with both ends sticking in the water. Use a tea lite candle as a power source. The boat's hull can be made from almost anything that floats; balsa wood, Styrofoam, a tin can or an old plastic dish. I've included pictures of various kinds. There's also a great website all about pop pop boats with history, physics, and tutorials. Check it out and have fun.

Pop Pop Pages


Five Little Piggies Glove Puppet Craft


This is another great Japanese craft idea. Make a glove to teach the 5 Little Piggies rhyme. Take a knit glove. Stuff the fingertips with cotton and tie off with thread into little fingertip balls. Then cut little pieces of felt and decorate each finger as one of the 5 little pigs. I like the one with roast beef. Use the glove to teach the rhyme. Use the consept to make other gloves for rhymes, eg. 5 Little Monkeys or the Finger Family song.

Banchan

Peanut People Drum Puppet Craft


Here's a cute Japanese craft idea. Make these peanut drum puppets from a paper bag on a chopstick or skewer.

Materials:

  • chopsticks or bamboo skewers
  • small paper lunch bag
  • old newspaper or cotton
  • tape
  • brown marker
  • string
  • plastic bottle caps

Directions:
  1. Stuff old newspaper or cotton into a small paper lunch bag. Pinch and tape the top of the head so it stands up. Pinch the bag in the middle into a peanut shape.
  2. Stick onto a chopstick or skewer and tape the bottom.Decorate with a marker to look like a peanut with eyes and a mouth. You could also cut and paste on the face.
  3. Tie 2 short lengths of string to the peanut. Tape bottle caps to the other ends for hands.
  4. When you twist the peanut puppet, the bottle cap hands hit the body like the drum from the Karate Kid 2.
Banchan

Halloween Pom Pom Jack-O-Lantern Craft


Here's a cute Halloween Pom pom Jack-O-Lantern craft idea. Make your own pom poms from orange yarn.

Materials:

  • orange yarn
  • black felt
  • glue
  • scissors
  • rubber band
  • card stock

Directions:
  1. Wrap orange yarn about 100 times around a piece of card stock about 3 inches wide.
  2. Crefully remove the card. Pinch the yarn and secure with a rubber band in the middle.
  3. Take scissors and cut the ends. Trim and flff into a ball.
  4. Cut and glue on little pieces for a face from black felt.
  5. Tie with a piece of yarn and hang up.
Banchan

Saturday, July 14, 2012

Paper Cup Chinese Dragon Craft


Here are a couple of versions of a paper cup Chinese Dragon craft.

Materials:
  • paper cups
  • string
  • sharp pencil
  • scissors
  • toilet paper rolls
  • decorating materials(pipe cleaners, Styrofoam balls, colorful paper, etc.)
  • glue

Directions:

  1. Poke a hole in the bottom of all the cups with a sharp pencil.
  2. Cut the toilet rolls into short rings.
  3. Tie a big knot in a string and thread onto a paper cup so the knot is on the inside.
  4. Thread on a toilet roll ring, then another cup. The toilet roll rings allow a little space between the cups so they can move.
  5. Continue this process until your dragon is long enough.
  6. For the head, you can just decorate the last cup or cut 2 "V" shapes on either side of a cup and thread on the opposite way to make a mouth.
  7. Decorate your dragon; add colorful paper, pipe cleaner horns, eyes etc.

Go here for a PDF tutorial

Variations:
Adding the toilet roll rings adds weight to the dragon. Another alternative is punch holes on either sides and attach the cups with brass fasteners/butterfly clips.


CD Balloon Hovercraft Toy 2


This is a really cool science experiment toy that is so easy to make. You can make your very own hovercraft toy with a CD, a balloon, a dish soap cap, and glue. It floats around on a cushion of air like an air hockey puck. Go here for a full tutorial with pictures. Have fun.

Scribbit

CD Balloon Hovercraft Toy 1


This is a cool CD balloon hovercraft toy. You can make this science experiment craft with a balloon, a CD, and a few other things around the house. It floats on a cushion of air like an air hockey game.

Materials:

  • CD
  • 35mm film case with lid
  • balloon
  • drinking straw
  • electrical tape
  • scotch tape
  • sharp tool to poke a hole with
  • scissors
  • glue

Directions:

  1. Poke a small hole in the bottom of the 35mm film case.
  2. Make a slightly larger hole in the film case lid, big enough for the straw to fit through.
  3. Cut a straw a few inches long and tape a balloon around the straw with electrical tape or other strong tape.
  4. Tape the film case over the hole in the CD. Secure with glue so no air comes out.
  5. Insert the balloon straw through the lid.
  6. Blow up the balloon and then put the lid on the film case and watch the CD float around.


Thursday, July 12, 2012

Halloween Bean Bag Toss Game Craft


Here's a cute and simple design for a Halloween Bean Bag Toss game craft. Follow the link for more great Halloween craft ideas.

Cacareco

Halloween Jar Lanterns Craft


These are great ideas for making Halloween lanterns from old jars. This comes from a Portuguese site. Just use paint or glue on tissue paper for the background color. Then cut out face parts from black paper and glue on.

Cacareco

Halloween Characters Toilet Roll Crafts


Here are some more great Halloween Characters Toilet roll craft ideas from a Portuguese site. Follow the link for more great inspiring pictures and ideas.

Cacareco

Summer Paper Clay Fish Craft


This is a cute summer fish craft from paper clay. Use interesting objects to make impressions in the clay.

Materials:

  • paper clay
  • paints
  • interesting objects(shells, bottle caps, small toys, etc.)
  • ribbon

Directions:
  1. Mold your paper clay into a fish shape.
  2. Press all kinds of objects into the clay to make impressions. If you press an object all the way through, remove from the hole and put on top. Press a hole in the top
  3. Paint your fish. Allow to dry.
  4. Tie a ribbon and hang up.

Stand Up Restaurant Craft


This is a stand-up restaurant craft that my daughter made. It has secret windows that reveal a hidden picture inside. There's ramen noodles in one window, and ice cream in another. There's a customer coming out of the door. This idea could be used to make other buildings like a haunted house or school.

Materials:

  • various colored card stock
  • scissors
  • sharp craft knife
  • crayons
  • paper
  • glue

Directions:

  1. Decide on what kind of building or business you want to make. Cut some doors and windows on a piece of  colored card stock.
  2. Draw pictures to go in the windows and door and cut them out.
  3. Glue your pictures behind the window.
  4. Fold the corners down and glue to another sturdy piece of card stock for the base, so your building stands up.
  5. Cut out and add other details on the front like a car, trees, etc.

Submit your craft! Do you have a great craft tutorial or idea you want to share and reach a wider audience? Visit my Submit page and my new, easy-to-use submission form.

Related Posts Plugin for WordPress, Blogger...