Thursday, May 31, 2012

Easy Trumpet Music Craft

This is an easy trumpet music craft you can make from some paper and a toilet paper roll. Looks great!

Materials:

  • toilet paper roll
  • yellow or gold paper
  • scissors
  • glue
  • 3 buttons

Directions:

  1. Trace and cut out 2 funnel shaped pieces from yellow or gold paper. The long part should match the length of the toilet paper roll.
  2. Glue the 2 pieces around the toilet paper roll and glue the ends together to make a 3D horn shape.
  3. Glue on 3 buttons on the top.
Thanks to Tessa and her lovely daughter for the pic. Check out her great site below.
Source: Bible Story Hour
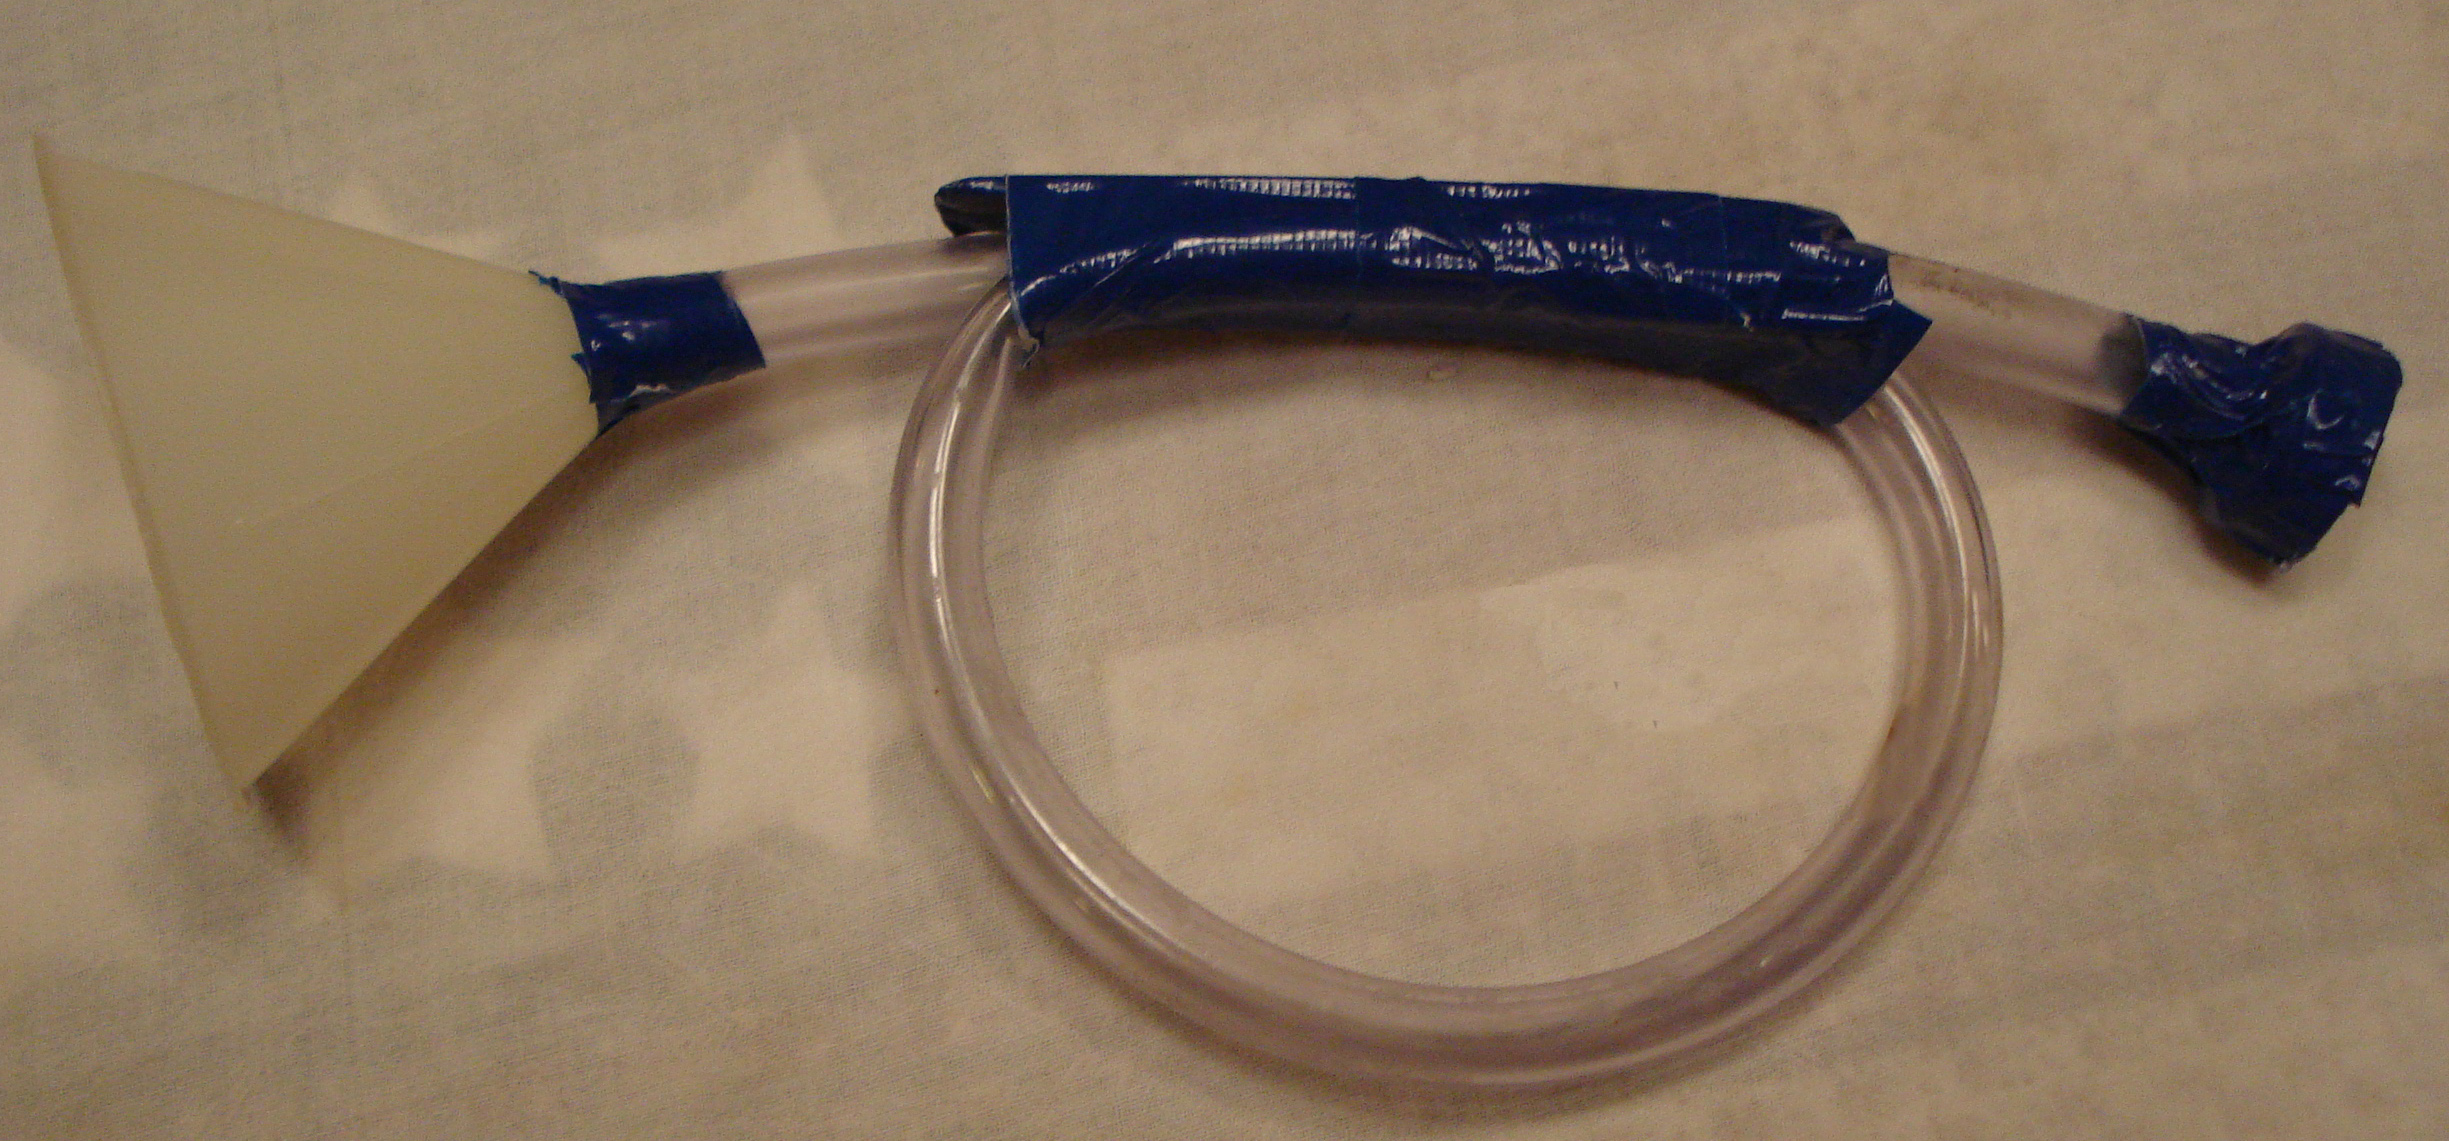
Trumpet/Bugle Music Craft


The original inspiration for this craft was Gideon from the Bible. This is "Gideon's Trumpet" as he leads his army to victory against the Midianites. But it could just as easily be a bugle.

Materials:

  • 1/2" hose about 24" long
  • small funnel
  • large craft stick
  • colored duct tape
  •  wide screw on plastic cap(like from a wide mouth juice bottle)
  • scissors
  • electric drill
  • gold spray paint(optional)


  • Directions:

    1. Have an adult drill a 1/2 inch hole through the middle of the plastic cap .
    2. Stick the funnel into the hose and secure with tape.
    3. Stick the plastic cap over the other end and secure with tape to make the mouthpiece.
    4. Loop the hose into a bugle shape. Attach a craft stick and tape in place.
    5. Spray paint the whole thing gold for a professional look.
     Source: Concordia Congregation

    Toilet Roll Kazoo Music Craft

    The simplest ideas are the best. The simple toilet paper roll kazoo craft only takes minutes, but will entertain the kids for hours.(whether you like it or not)

    Materials:

    • toilet paper roll
    • wax paper
    • rubber bands
    • scissors
    • crayons, stickers
    • white paper and glue(optional)

    Directions:

    1. Decorate the outside of your toilet paper roll. It might look better if you cover you roll in white paper first and then color. Add stickers if you want.
    2. Cut a circle from wax paper.
    3. Tie the wax paper over one end of the toilet roll with a rubber band.
    4. Play your new kazoo!
    Source: That's What We Said

    Tissue Box Guitar Craft

    This tissue box guitar craft is a classic that never gets old. Simple and fun to play.

    Materials:

    • tissue box
    • rubber bands
    • paper towel roll
    • scissors
    • tape

    Directions:

    1. Wrap some rubber bands around an empty tissue box.
    2. Cut one inch slits around one end of the paper towel roll and flatten out.
    3. Tape the flat end to the end of the box for a handle. Rock on!

    Variations:

    1. If your box doesn't already have a pretty pattern, decorate the outside with stickers or scraps of paper.
    2. For a more professional look, trace the end of the paper towel roll on the end of the box, cut out., and insert the roll for a handle.
    3. The simplest guitar of all doesn't need a handle.
    Source: Little Learners Lounge

    Rock Dominoes Toy Craft

    I thought this rock dominoes toy craft idea absolutely fabulous. The simplest ideas are the best. They'll create hours of fun.

    Materials:

    • many flat, smooth rocks of more or less same size
    • black and white acrylic paint
    • paint brushes, Q-tips
    • mod podge or paint sealer(optional)
    • real set of dominoes for reference

    Directions:

    1. Wash and dry the rocks.
    2. Paint them all black and allow to dry.
    3. Use a small brush or Q-tip to paint white lines and dots to make dominoes. Allow to dry.
    4. Coat with a paint sealer or mod podge if desired for durability and a glossy finish.
    5. Store in a small felt or leather bag or an old jar.


    Source: Repeat Crafter Me

    Paper City Printables Toy Craft

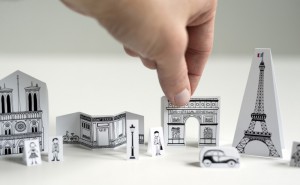
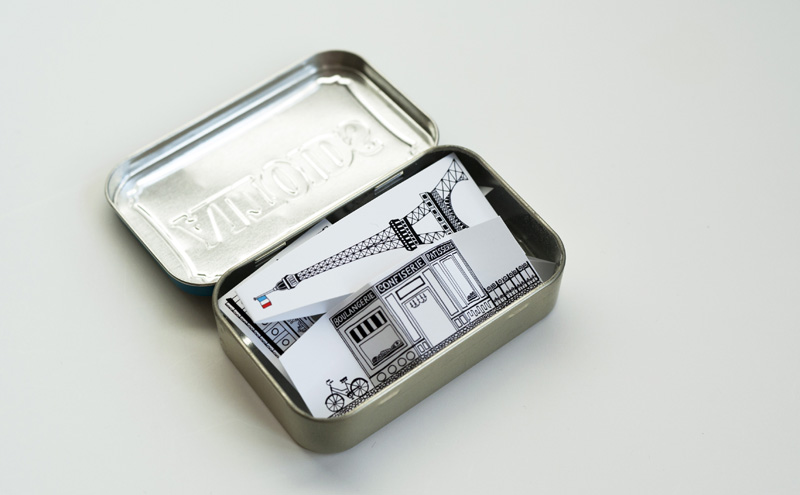
    This site is amazing. It has hundreds of paper building free printables. All this original artwork can be printed, cut out, and folded into a little play city complete with cars, people, trees, and landmarks. Choose from Paris, Sydney, or a generic cityscape. Makes for hours of fun.

    Materials:

    • computer and printer
    • paper city templates
    • card stock or thick paper
    • scissors
    • crayons and markers(optional)

    Directions:

    1. Visit the site below and print out the city templates on card stock.
    2. If desired, color your buildings.
    3. Cut out.
    4. Fold at the top to create a portable cityscape that stands up on its own. Easy to store and carry.

      
    Source: Made by Joel

    Tissue Box Catapult Toy Craft


    This tissue box catapult toy craft shoots marshmallows.

    Materials:

    • family-sized tissue box
    • scissors
    • 2 unsharpened pencils
    • rubber bands
    • hole punch
    • push pin
    • pen
    • glue dots
    • plastic cap(bottle cap or 35mm file case cap)
    • tape
    • marshmallows 
    Directions:

    1. Cut the top off a large tissue box as shown.
    2. Punch a hole on the side of the box about 2 inches from the end and 1/2 inch from the top of the box. Punch a matching hole on the other side.
    3. Use a push pin to make a hole on the opposite end of the box in the center, about 1/4 inch from the bottom. Enlarge the hole slightly with  pen.
    4. Cut a rubber band. Tie a small loop in one end. Insert the other end from the inside, through the small hole in the far end of the box. Tie around a short length of pipe cleaner and tape down on the outside of the box. This will be the power of the catapult.
    5. Tie 2 pencils into a cross shape with a rubber band.
    6. Insert the pencil into the holes on the sides as shown.
    7. Attach the plastic cap to the arm of the catapult with glue dots or tape.
    8. Loop the rubber band from the bottom around the bottom of the catapult arm.
    9. Pull back the arm, insert a marshmallow into the cap and let fly.
     Source: Family Fun

    Paper Guitar/Banjo Shapes Craft

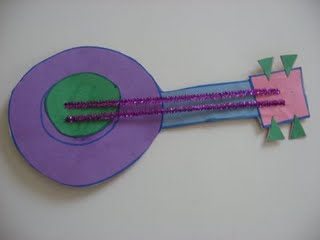
    This simple guitar/banjo craft is made from various shapes.

    Materials:

    • construction paper
    • cereal box
    • marker
    • scissors
    • pipe cleaners
    • glue
    • tape

    Directions:

    1. Draw the following shapes on various colored construction paper and cut out; 1 large circle(body), 1 smaller circle(center), 1 rectangle(neck), 1 square(head), and 4 small triangles(tuning knobs).
    2. Glue the pieces together on the inside of an old cereal box and allow to dry.
    3. Cut out the banjo.
    4. Poke 2 holes in the head and in the center circle and thread 2 shiny pipe cleaners through for strings. Tape the pipe cleaners in place on the back.

      
    Source: No Time for Flash Cards

    Paper Plate Banjo Music Craft

    This great-looking paper plate banjo craft is simple and fun to make. It'll be music to your ears.

    Materials:

    • 2 paper plates or plastic plates
    • stapler
    • paints
    • stickers
    • rubber bands
    • glue
    • beads
    • paint stick
    • tape

    Directions:

    1. Stack 2 paper plates together and staple together for durability.
    2. Paint the stacked plates and/or decorate with stickers.
    3. Glue a paint mixing stick to the back of the plates. Secure with some tape.
    4. Glue little beads on the end of the stick for tuning knobs.
    5. Stretch some rubber bands across the plate and play your banjo.
     Source: Le Top Blog

    Monday, May 28, 2012

    Paper Plate Flying Saucer U.F.O. Space Craft 2

    Let your kids imagination go wild with this Paper Plate Flying Saucer U.F.O. Space Craft. There's no one right way to do it. Use the materials you have handy.

    Materials include:

    • paper plates
    • paper bowls
    • plastic pudding cups
    • paint, crayons, or markers
    • decorating materials; stickers, spangles, sequins, etc.
    • glue

    Directions:
    1.  You can use 1 paper plate or glue 2 together.
    2. You can paint or otherwise color.
    3. The fun part is the cockpit. Use a paper bowl or plastic pudding cup. Don't forget to put a toy alien inside or one you drew.
    4. Decorate the outside. Remember shiny and sparkly is better.
    5. Cut a long length of fishing line and hang them low to everyone can see the tops. For fun, they could dive bomb your dinosaur diorama.


    Source: Arts for Life

    Paper Plate Flying Saucer U.F.O. Space Craft 1

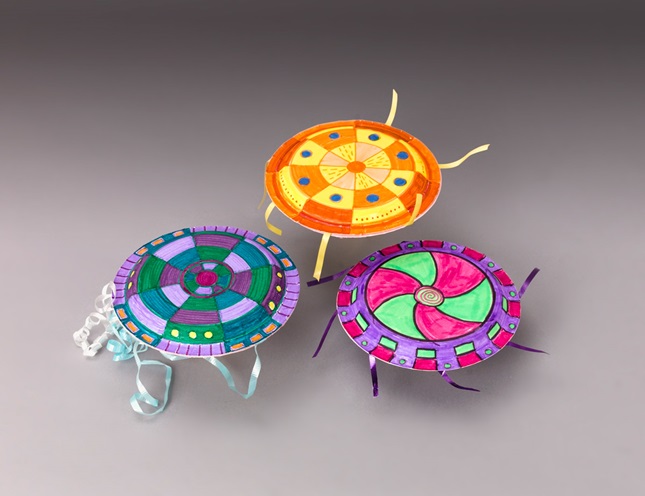
    Make your very own paper plate flying saucer U.F.O. space craft with this simple and colorful idea.

    Materials:

    • 2 paper plates
    • crayons or markers
    • ribbon or reflective tape
    • scissors
    • glue
    • stapler(optional)

    Directions:

    1. Decorate the bottom of 2 paper plates with geometric shapes as shown with crayons or markers
    2. Cut short lengths of reflective tape.
    3. Put a line of glue on the rim of 1 paper plate and put a few pieces of reflective tape sticking out.
    4. Sandwich the other paper plate on top. Allow to dry.
    5. If desired, staple the rims to be extra secure.
    6. To play a game, Put a hula hoop on the ground as a planet target and take turns getting your U.F.O. safely to the planet.


    Source: Crayola

    Recycled Space Rocket Craft

    You'll be flying high with this fun recycled space rocket craft made from a plastic bottle.

    Materials:

    • rocket wings template including planets in the background
    • empty and washed plastic drink bottle(Gatorade)
    • silver card stock
    • scissors
    • bottom cut from an aluminum can
    • aluminum tea lite
    • battery powered tea lite
    • hot glue gun
    • plastic toy alien

    Directions:

    1. Follow the link below and print out the wing templates or draw your own.
    2. Cut the wings from silver card stock and hot glue to the plastic bottle.
    3. Cu the bottom off an aluminum can as shown on the website instructions with strong scissors or a knife.
    4. Glue the can bottom to the bottom of the plastic bottle.
    5. Glue the battery powered tea lite into the can bottom for the flames.
    6. Insert a little alien in your bottle and blast off.

    Variations:

    To make a much simpler version of this craft, omit the aluminum can and tea lite and glue on strips of red and orange tissue paper for flames.


    Source: Craft Junkie

    Halloween Alien Party Mask Craft

    You'll be the life of the party with these Halloween alien party masks.

    Materials:

    • mask template(from site below)
    • plastic eye masks
    • green craft foam
    • permanent marker
    • scissors
    • craft knife
    • double sided foam tape
    • duct tape
    • ping ping balls
    • pipe cleaners
    • pushpin
    • 1 inch size google eyes
    • glow in the dark stickers

    Directions:

    1. Follow the link below and print and cut out the mask template.
    2. Trace and cut out the head and ear pieces on green craft foam.
    3. Trace the plastic mask on the back of the foam headpiece including the eyes. Make sure the alien's eyes line up. Cut out the alien eyes.
    4. Attach the headpiece and ears to the plastic mask with double sided foam tape.
    5. Decorate the mask wit stickers and google eyes.
    6. Use a pushpin to make a hole in a 2 ping pong balls. Push a pipe cleaner into the balls.
    7. Tape the antennae to the back of the headpiece with duct tape.
    8. Wear your mask. Become an alien.


    Source: Family and Fun

    Saturday, May 26, 2012

    Monster, Alien, Robot Box Craft

    These are cute little monster, alien, robots from little cardboard boxes. They are  great creative craft for monster week, space week, Halloween, or anytime. The original craft used tissue paper, but it's pretty free-style and you can use any materials you have on hand.

    Materials:

    • small cardboard boxes like jello or raisin boxes
    • pipe cleaners
    • tissue paper scraps
    • aluminum foil
    • scrap construction paper
    • glue
    • sharp knife(adult only)
    • google eyes
    • wire cutters or strong scissors
    • pencil

    Directions:
    1. Brush glue over your box and cover in tissue paper scraps or aluminum foil.
    2. Glue on details like eyes, mouth, etc.
    3. Use a sharp knife to cut tiny X's to insert the pipe cleaner legs and antennae.
    4. Cut the pipe cleaners for antennae and 3 or 4 legs. Make twisty antennae by wrapping around a pencil. Make little circles or ovals at th end for the feet.
    5. Insert the pipe cleaners into the holes and stand up your little monster.
    Source: Craft Jr.

    Halloween Monster Alien Jars Craft

    This Halloween monster Jar Craft is simple and is a great decoration for your Halloween party.

    Materials:

    • corn syrup
    • empty jars
    • green food coloring
    • google eyes

    Directions:

    1. Pour corn syrup into a jar. Add food coloring and mix well.
    2. Add your google eyes. Weigh them down if you want them to sink to the bottom.

    You could also use the same idea with jello in a jar. Just don't eat the eyes.!

    Source: Makes and Takes

    Cup Rocket Launcher Toy Craft


    Here's a really fun rocket launcher toy craft made from 2 plastic cups.

    Materials:

    • 2 plastic cups
    • 2 strong rubber bands
    • thick tape like masking tape or carpet tape
    • thick paper or construction paper
    • crayons
    • scissors

    Directions:
    1. Cut 4 short slits in a cross shape on the rim of one cup.
    2. Cut 2 rubber bands, tie a knot in the ends and slip the ends into the slits to form an "X" inside the cup.
    3. Put some tape over the slits and ends to secure.
    4. Draw and decorate a rocket from thick paper and cut out.
    5. Tape your rocket to the front of the cup.
    6. Push the rocket cup down on top of another cup. Let go and the rocket shoots up.
    Source: Preschool Alphabet

    Moon Paper Craft

    Here's an easy and fun moon craft the kids can hang up and admire.

    Materials:

    • yellow construction paper
    • pencil
    • scissors
    • hole punch
    • string
    • tissue paper scraps
    • glue
    • glitter glue

    Directions:

    1. Trace a large crescent moon on yellow paper. Use a template or raw your own. Cut out.
    2. Glue on tissue paper scraps to decorate your moon.
    3. Spread glitter glue on top. Allow to dry.
    4. Punch a hole at the top of moon. Tie a string to hang up.
     Source: Gulf Beaches Library Kids Page

    Moon Rocks Space Craft

    This easy moon rocks craft is another great space craft idea from Mrs. Karen's Preschool Ideas.

    Materials:

    • rocks(moon looking ones)
    • silver paint
    • paintbrushes
    • black and white tissue paper
    • silver glitter or litter glue

    Directions:

    1. Paint rocks with silver paint and stick on squares of tissue paper. Paint over everything.
    2. Sprinkle silver glitter all over your rocks. Allow to dry.

    Source: Mrs. Karen's Preschool Ideas

    Sun Fingerpainting Space Craft

    This Sun fingerpainting space craft looks absolutely fabulous. The example is a brilliant sun but you could use the same concept with different colors to make the other planets. Let your imagination go. This craft is cool because each students creation is unique.

    Materials:

    • white construction paper or card stock
    • red, orange, and yellow paint
    • large sheet of black construction paper
    • plastic wrap
    • Q-tips
    • newspaper

    Directions:

    1. Cut a large circle from construction paper or card stock
    2. Lay down old newspaper. Put the circle on the newspaper and put some dabs of red, orange, and yellow paint.
    3. Cover the circles with plastic wrap. Kids squish and push the paint around with their fingers.
    4. Spread a little glue in the center of the black paper to help the sun stick beter.
    5. Remove the plastic wrap and place the circle on the black paper.
    6. Dip Q-tips in paint and paint the sun rays or solar flares. Allow to dry.


    Source: Mrs. Karen's Preschool Ideas

    Name Rocket Space Craft


    Here's a name rocket craft great for your school's space week.

    Materials:
    • construction paper including sheets of black paper
    • scissors
    • marker or crayons
    • star stickers or paper stars
    • glitter glue
    • glue
    Directions:
    1. Beforehand cut a lot of squares and triangles from various colors of construction paper. Each child needs one triangle and one square for each letter in their name.
    2. Give each student sheet of black construction paper, a triangle and squares for their names.
    3. Students write each letter of their names on the squares.
    4. Glue the squares on the black paper to make the name rocket. Put the triangle on top.
    5. Glue stars in the sky.
    6. Add lines of glitter glue at the bottom of the rocket for flames. You could also use pipe cleaners.
    7. Put all the rockets on the bulletin board.

    Source: Mrs. Karen's Preschool Ideas

    Friday, May 25, 2012

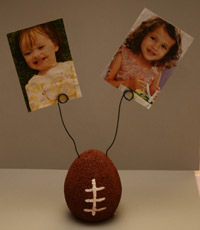
    Father's Day Football Picture Frame Sports Craft

    This Father's Day football picture frame is a really creative idea. I love it.

    Materials:

    • Styrofoam egg
    • 18 gauge wire
    • brown paint, brushes
    • sharp knife
    • wire cutters
    • white 3D paint or white out pen
    • pencil
    • favorite photos

    Directions:

    1. Cut the bottom of the Styrofoam egg so it stands up.
    2. Paint the egg brown. Allow to dry.
    3. Use white 3D paint to paint on the football laces or use a white out pen. Allow to dry.
    4. Wrap the wire around a pencil 3 times to make a spiral. Cut the wire about 5 inches below the spiral.
    5. Stick the wire into the top of the football.
    6. Insert a couple of favorite photos into the loops of the spiral.

    Variations:
    1. Use a Styrofoam ball, white and red paint to make a baseball.
    2. Use orange and black paint to make a basketball.
    3. For added stability, glue the bottom of the Styrofoam ball to a square of construction paper or cardboard.


    Source: All Kids Network

    Thursday, May 24, 2012

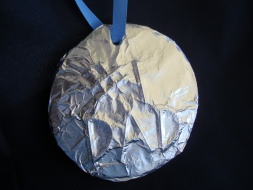
    Father's Day #1 DAD Olympic Medal Craft

    Dad will feel like an Olympic winner when he wears this Father's Day #1 DAD Medal craft.

    Materials:

    • old cereal box or cardboard
    • drinking glass for circle template
    • pipe cleaners
    • scissors
    • glue
    • aluminum foil or gold foil
    • hole punch
    • ribbon

    Directions:

    1. Use a glass to trace a circle on cardboard like an old cereal box and cut out.
    2. Cut pieces of pipe cleaner and glue them on the circle to spell, #1 DAD. Allow to dry.
    3. Wrap foil around the circle. press your fingers over the pipe cleaners to make them stand out.
    4. Punch a hole at the top. Lace a ribbon through and tie for a necklace.
    

    Source: Busy Bee Kids Crafts

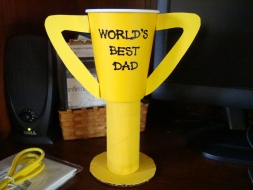
    Father's Day Trophy Craft

    Dad will be proud to display this Father's Day Trophy craft on his desk. He can also use it s a candy dish to fill with his favorite snacks.

    Materials:

    • handles template (from site below)
    • paper cup
    • toilet paper roll
    • paint and brushes
    • markers
    • old cereal box
    • cardboard
    • scissors
    • glue
    • decorations

    Directions:

    1. print out the handles and bottom template and cut out.
    2. Trace handles and bottom template on an old cereal box and cut out. It might also be better to trace the bottom from thicker cardboard.
    3. Paint the paper cup, toilet paper roll, handles, and bottom the color you want your trophy. The example pictured here is yellow. Gold or silver would look good. If you plan to make many for a class, it would be better to buy colored paper cups to save time. You could also cut the handles from construction paper.
    4. Write a message on the front of the cup like, "#1 Dad", or "World's Best Dad".
    5. Fold down the ends of he handles and glue to the sides of the cup.
    6. Tun the cup upside down. Pipe glue along both ends of the toilet paper roll. Stick one end to the bottom of the cup and the other to the circle bottom. Dry upside down.
    7. After drying, add other decorations as desired.

     Source: Busy Bee Kids Crafts


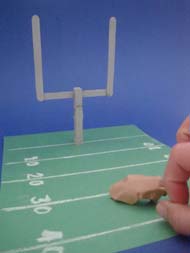
    Mini Football Game Sports/Father's Day Craft

    You'll have hours of fun with this simple football game craft. Also great for a Father's Day Craft.
    Materials:
    • green construction paper
    • chalk
    • ruler
    • 3 craft sticks
    • clothespin
    • gray paint
    • glue
    • brown paper
    • Playdough (optional)
    • Football team stickers
    Directions:

    1. Paint 3 craft sticks and a clothespin gray. Allow to dry.
    2. Glue the craft sticks together to create the top of the goal post. Clip to the clothespin to make the bottom. It will stand on its own.
    3. Use a ruler and chalk to draw ten yard lines to about 40 with numbers and the end zone on the green paper. You could also decorate with stickers of your favorite team and write the name in the end zone.
    4. Crumple a piece of scrap brown paper to make a football. Or fold a sheet of paper into the triangle footballs you used to make in elementary school.
    5. Set up the goal post in the end zone. Flick the ball through for a field goal. Put the game on the table during the big game. Play during the commercials.
    6. If desired, anchor the goal post with some playdough or clay so it doesn't fall over.

    Soccer Award Paper Plate Sports Craft

    Award your favorite soccer star with this great looking soccer craft from a paper plate.

    Materials:

    • paper plate
    • red or orange paint
    • soccer ball template(from site below)
    • black crayon
    • scissors
    • tape
    • glue
    • crepe paper streamers
    • small pom poms
    • yarn

    Directions:

    1. Paint a paper plate red or orange and allow to dry.
    2. Print out the soccer ball template from he site below and color with a black crayon and cut out.
    3. Glue the soccer ball to the center of the paper plate.
    4. Tape yarn to the back of the paper plate to hang up.
    5. Cut some lengths of crepe streamers. Cut one in half lengthwise. Glue the streamers to the back of the paper plate. The thicker, longer ones should be in the middle, the thinner shorter ones on the sides.
    6. Glue pom poms around the rim of the paper plate. Sparkly pom poms look great.
    7. If desired, add a line or 2 of glitter glue around the rim.
     Source: Kaboose

    Easy Baseball Paper Plate Sports Craft

    Use a paper plate to make a baseball with this easy craft. You can use it to decorate your room. Or use it as a target for a toss game. Or write the name of your favorite baseball team and take it to the game to show your spirit.


    Materials:

    • paper or plastic plate(the deep dish kind works best)
    • red marker
    • pipe cleaner
    • scissors
    • hole punch

    Directions:

    1. Draw stitches on the back of a paper plate with a red marker to look like a baseball.
    2. Cut out the rim from the paper plate.
    3. Punch a hole at the top and tie a pipe cleaner to hang up.
    4. If desired, write the name or logo of your favorite baseball team.


    Source: Kids Craft Zone

    Wednesday, May 23, 2012

    4th of July Shaker Cup Craft

    Fourth of July Paper Cup Shakers craft

    Show you patriotic spirit on Independence Day with this cool 4th of July shaker craft made from 2 paper cups.

    Materials:

    • 2 paper cups
    • dry beans or rice
    • red, white, and blue crepe paper
    • acrylic patriotic color paints
    • paintbrushes
    • glue gun
    • glue stick
    • masking tape
    • scotch tape
    • small star stickers
    • scissors

    Directions:
    1.  Fill one cup about halfway with dry beans or rice.
    2. Glue the open ends of the cups together with a glue gun.
    3. Reinforce the seal with masking tape.
    4. Paint your shaker all white as a base coat. Allow to dry.
    5. Paint your shaker like an American flag; put star stickers on most of one cup for the blue field, paint blue. Paint red stripes on the other side. Allow each color to dry. Remove star stickers to reveal white stars.
    6. Cut a few strips of patriotic color crepe paper and tape to each end for streamers.
    7. Shake your 4th of July shaker to show your spirit on Independence Day.


    Source: First Palette

    Tuesday, May 22, 2012

    Olympic Torch Craft 1

    Here's a cool Olympic torch craft that's simple to make. You could also wrap the torch with gold foil to match the look of the real 2012 London Olympic torch. Also great for a halloween costume.

    Materials:

    • 1 sheet of white construction paper
    • tape
    • red, yellow and orange tissue paper
    • glue
    • gold foil(optional)

    Directions:

    1. Roll the construction paper into a tube and secure with tape.
    2. If desired, wrap with gold foil and tuck down into the ends.
    3. Sandwich together the three colors of tissue paper; red on bottom, then orange and yellow.
    4. Gather in the middle wityh the red on the outside like a bunch of flowers.
    5. Put glue inside he big openning and insert the tissu paper fire. Allow to dry.
     
    Source: Kaboose

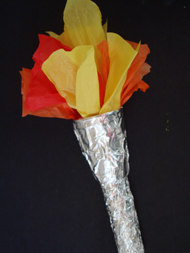
    Olympic Torch Craft 2

    This is a great Olympic torch craft that's simple and fun to make. The one pictured is silver using aluminum foil, but the real 2012 London Olympic torch is gold, so you could substitute gold foil to match. This torch could also be equally good for a medieval Halloween costume.

    Materials:

    • paper towel roll(or 3 toilet paper rolls tapes together)
    • paper cup
    • scissors
    • aluminum foil or gold foil
    • red, yellow, and orange tissue paper
    • glue

    Directions:

    1. Use the paper towel roll and trace a circle in the bottom of the paper cup and cut out.
    2. Push the paper towel roll up ito the cup until it' almost flush with the cup.
    3. Wrap the whole tube with foil. Tuck down inside both ends.
    4. glue strips of red, yellow, and orange tissue paper down inside the cup.

     source: Busy Bee Kids Crafts

    Olympic Gold Medal Kids Craft 1

    Here's a fun Olympic Gold medal kids craft for even the youngest students. Great to celebrate the 2012 London Olympics or the school field day.

    Materials:
    • old cereal box
    • glass to trace a circle
    • marker
    • scissors
    • yellow or gold tissue paper
    • gold glitter glue or glitter
    • hole punch
    • ribbon or yarn

    Directions:

    1. Use a glass and trace a circle on the cereal box and cut out.
    2. Punch a hole at the top
    3. Smear with glue and let kids put on small pieces of yellow or gold tissue paper.
    4. Add glitter glue or put glue and sprinkle on glitter. Allow to dry.
    5. Tie a ribbon or piece of yarn.

    Source: Preschool Learning and Crafts

    Big Olympic Gold Medal Kids Craft 2

    Here's yet another great craft dea from Allison McDonald from Family Education. This Olympic gold medal craft will look great as you watch the 2012 London Olympics.

    Materials:
    • sparkly gold foam(the self-adhesive kind is best)
    • tape
    • scissors
    • ribbon
    • CD
    • marker

    Directions:

    1. Trace a CD on the gold foam wih a marker and cut out.
    2. Peel off the backing and stick to the CD or use glue.
    3. Tape ribbon to the back and wear.

    Alternative

    If you don't have gold foam, trace and cut out from an old cereal box. Smear glue all over and cover with gold glitter. Or use glitter glue.

    Glue a foam #1 to the front r write the child's name with a marker.


    Source: Family Education

    Paper Plate Color Mixing Snail Craft

    This is a paper plate color mixing snail craft. The main purpose is to teach mixing colors and then turn it into a snail. Also fun for a bugs lesson.

    Materials:

    • paper plate
    • red, blue, and yellow primary colors finger paint
    • scissors
    • tape
    • marker
    • google eyes(optional)
    • pipe cleaner

    Directions:

    1. For each child put a dab of 2 primary colors on the paper plate to mix; yellow and blue make green, yellow and red make orange, red and blue make purple. Let each child decide.
    2. Mix colors with their fingers, fun! Allow to dry.
    3. Take scissors and starting from the edge, cut the plate into a spiral.
    4. Add eyes and mouth with markers or older kids can put google eyes.
    5. Curl the ends of a pipe cleaner and tape to the head.


    Source: Family Education

    Easy Stamp Wheel Craft

    Here's an easy stamp wheel craft you can make at home from old tape roll and some foam shapes. This is a fabulously simple and creative idea. The stamps here are clouds and raindrops, but you could make them for any theme.

    Materials:

    • empty packing tape cardboard tube(or other tap tube)
    • foam shapes or cut cut your own from foam
    • glue
    • ink pads
    • white paper

    Direction:
    1. Glue some foam shapes around an empty packing tape tube. You could also design and cut out your own foam shapes.
    2. Press stamp onto the color ink pad of choice.
    3. Roll your stamps onto white paper.
    Source: Inner Child Fun

    Monday, May 21, 2012

    Olympic Gold Medal Cookies Craft

    Here's an Olympic gold medal cookies craft that is fun and delicious. Use them as awards for your schools next field day or sports day.

    Materials:

    • your favorite cookies(bigger is better)
    • gold foil paper
    • colorful patriotic ribbon
    • scissors
    • hot glue or tape
    • black permanent marker


    Directions:

    1. Wrap cookie in gold foil paper
    2. Loop the ribbon and hot glue or tape the ends to the back of the foil.
    3. Glue or tape a foil circle on top of the ribbon.
    4. Write a message like "#1", or "1st place". Or write the name of the event or draw a simple picture like in the Olympics.


    Source: AlphaMom

    Olympic Torch Craft 3

    This is a great Olympic Torch craft just in time for the the 2012 London Olympics. Great for younger hands.

    Materials:

    • small paper plate
    • toilet paper roll
    • gold foil paper
    • scissors
    • glue
    • red and /or yellow, orange tissue paper

    Directions:

    1. Trace a toilet paper roll in the center of a paper plate.
    2. Cut slits all the way around the inside of the circle.
    3. Roll and glue gold foil paper to the toilet roll.
    4. Apply glue generously around the inside of one end  of the toilet paper roll. Put the paper plate on top and fold down the little triangles cuts down into the tube.
    5. Stuff red and orange tissue paper down into the tube for fire.
    6. Run with your Olympic torch.

    Source: AlphaMom

    Olympic Laurel Wreath Crown Craft 1

    Here's an Olympic laurel wreath crown craft just in time for the 2012 London Olympics. The athletes in the ancient Olympic games didn't receive medals, but simply a laurel wreath crown and the glory of the fans.

    Materials:

    • large paper plate
    • green and light green construction paper
    • scissors
    • glue
    • tape
    • ribbon

    Directions:

    1. Cut the center out of a large paper plate.
    2. Cut about a quarter out of the ring, so it fits the head better.
    3. Cut many simple leaves from green and light green paper.
    4. Start at the back end of the paper plate rim and start gluing the leaves in alternating colors down one side, then the other.
    5. Continue gluing the leaves together past the ends of the paper plate a few inches.
    6. Secure the bottom of the leaves that extend out with some tape.
    7. Tie a ribbon around the back of the wreath.
    8. Wear your Olympic laurel wreath crown craft watching the games or at your next toga party.

    Olympic Laurel Wreath Crown Craft 2


    Here's another great Olympic Laurel wreath craft idea that fun and simple. The Olympians of ancient times came from miles around to participate in the games, usually just a race or wrestling match. Their only prize, a laurel wreath and the praise and glory of the crowd.

    Materials:

    • plastic hairband
    • green craft foam or construction paper
    • scissors
    • glue gun or other strong glue

    Directions:

    1. Cut out many leaf shapes from green craft foam or construction paper. Use a template if you have one or trace your own. If you have pre-cut foam leaves, use those
    2. Start at the middle of the hairband. Hot glue the leaves going left and leaves going right until the ends.
    3. Wear your Olympic laurel wreath craft. Play ancient Greece include a toga.

    Source: Free Kids Crafts

    Olympic Olive Wreath Crown Craft 3

    This is a simple and cute Olympic Olive wreath crown craft the kids will love to make in time for the 2012 London Olympics or use them for sports day at school.

    Materials:

    • olive crown template
    • card stock
    • paper plate
    • green construction paper or craft foam
    • scissors
    • black paint
    • glue

    Directions:

    1. Visit the website below and print out the olive template on card stock or thicker paper.
    2. Use black paint and kids make finger or thumb prints to fill in the olives. Allow to dry. Cut out on the lines and put aside.
    3. Cut the center out of a paper plate.
    4. Cut simple leaf shapes from green paper or foam. If you have pre-cut foam leaves, use those.
    5. Place the paper plate ring bottom side up. Glue the leaves all the way around.
    6. Glue on the olive branches. Allow to dry.
    Source: Quality Kids Crafts

    Olympic Rings Paper Plate Craft


    Here's a great Olympic rings paper plate craft idea that's soo simple.

    Materials:
    • 5 paper plates
    • blue, yellow, black, green, and red crayons or paint
    • scissors
    • tape
    Directions:
    1. Cut the center out of 5 paper plates. Hint, Gently bend the paper plate, cut a slit in the  middle and cut around the inside.
    2. Color or paint the rings in the 5 colors.
    3. Cut the yellow and green rings.Slip the blue into the yellow and the red into the green. Then slip the black between the yellow and green.
    4. Tape the cuts and tape the rings in the back so they don't move.
    5. Display your Olympic rings paper plate craft.
    Source: Quality Kids Crafts

    Sunday, May 20, 2012

    Princess Party Hat Craft


    Here's a funny hat craft my daughter came home with from her Japanese elementary school. It was funny, everyone at home had  different opinion of what kind of hat it was. My dauhter said it was a birthday hat, I thought it was a princess hat, my younger daughter said it was a witch hat, and my wife said it was a clown's circus hat. All of the above are good answers. Whatever hat it is, you're kids will have a ball making and wearing it.

    Materials:

    • large sheet of pink sketching paper
    • colorful paper and fabric scraps
    • scissors
    • glue
    • tape
    • colorful string or paper twine

    Directions:

    1. Roll the pink paper into a large cone and tape together.
    2. Cut a "V" in the front so it fits better.
    3. Cut and glue on paper and fabric scraps to decorate. At the top, she folded a scrap piece of origami paper into a jewel.
    4. Tape a length of string on either side for a strap.
    5. Wear at the play, your next costume party, or anytime.

    Mother's Day Apple Card Craft


    Here's a cute Mother's Day Apple card craft my daughter made. You can glue the messages on the apples beforehand.

    Materials:

    • apple template
    • red, brown and green construction paper
    • white paper
    • scissors
    • yarn
    • hole punch
    • glue

    Directions:

    1. Find a good, simple apple template online. Print and trace and cut out 2 apples fro this craft from red paper.
    2. Trace and cut a simple stem from brown and a simple leaf from green.
    3. Type and print out the messages, "Happy Mother's Day" and "Thank you, I love you" on white paper.
    4. Cut out the messages and glue one on each apple.
    5. Glue the leaf and stem on the "Happy Mother's Day" apple.
    6. Have students trace and/or color the messages. Older students could just write them.
    7. Put the apple one on top of the other and punch 2 holes near the top.
    8. Tie a short length of yarn through the holes to complete your card.
    9. Don't forget to write your name.


    Bouquet of Flowers Paper Craft


    Here's a bouquet of flowers craft that my older daughter made. It was completely spontaneous and her own inspiration. She did it almost completely by herself. I was very impressed. This would be great as a Mother's Day or Valentine's Day craft or anytime you want to give flowers.

    Materials:

    • large sheet of sketching paper or card stock
    • colorful wrapping paper(she used Christmas left overs)
    • green origami paper or construction paper for the stems
    • colorful fabric or paper scraps
    • scissors
    • glue

    Directions:

    1. Cut a large, long triangle from wrapping paper.
    2. Cut thin strips for stems from green paper
    3. Cut some big and small circles from colorful fabric or paper for the flowers.
    4. Start with the wrapping paper and glue all the pieces together on the card stock.


    Saturday, May 19, 2012

    Olympic Rings Tissue Paper Collage Craft

    Just in time for the 2012 London Olympics, here's a simple and fun Olympic rings craft. This collage craft is made from tissue paper.

    Materials:

    • Olympic rings color template from the sit below
    • card stock
    • blue, yellow, black, green, and red tissue paper or crepe paper
    • glue
    • thin brush or Q-tip

    Directions:

    1. Print out the color Olympic rings template onto white card stock or print out on white paper and glue onto card stock.
    2. Cut the tissue paper colors into 1 inch square pieces
    3. Paint glue on the rings one by one with a brush or Q-tip.
    4. Crumple up tissue squares and glue on the rings one by one. Be sure the ring colors overlap correctly.

    Source: Free Kids Crafts

    Football Name Plaque Sports Craft

    This is a great football name plaque sports craft you can make during football season. This looks great on the bulletin board of your class or with your kids names' on the wall at home. Dad will want one, too.

    Materials:

    • 2 copies of the football template
    • construction paper or thin cardboard
    • white paper
    • scissors
    • glue
    • glitter glue

    Directions:

    1. Print out 2 copies of the football template from the site below onto white paper. Cut one football out whole. Cut the other one apart to use the white "stripes".
    2. Trace the whole football outline onto thin cardboard or brown or pink construction paper and cut out.
    3. Glue on the white stripes cut from the second template.
    4. Cut one long thin strip and a few short strips from white paper and glue on to make the laces.
    5. Write students' names on the football with glitter glue.
    6. Hang on the wall.
    Source:  Free Kids Crafts

    Easy Footballl Sports Craft

    Here's a really simple football sports craft you ca do on a rainy day.

    Materials:

    • cardboard
    • pencil
    • painter's tape, masking tape, electrical tape, etc.
    • brown paint
    • paintbrush
    • scissors

    Directions:

    1. Draw an oblong football shape on a piece of cardboard.
    2. Use painter's tape or other thick tape to the football stripes and stitches.
    3. Paint the whole thing brown. Allow to dry.
    4. Peel off the tape and cut out your football.
    Source: Family Education

    Friday, May 18, 2012

    Easy Cardboard Top Toy Craft


    Here's a really simple and fun idea. Make a fun spinning top toy from cardboard and a pencil.

    Materials:

    • cardboard(a cereal box works well)
    • white paper
    • glue
    • cup or lid to trace the circle
    • crayons
    • pencil(3-4 inches long)

    Directions:

    1. Glue white paperonto cardboard. It's easier to decorate on white paper.
    2. Trace a circle and cut out.
    3. Divide circle into sections and color in. Or decorate however you like.
    4. Poke a hole in the middle and insert a short pencil.

    The pencil will draw as it spins, so it's better to play on a piece of paper. See who's top can last the longest.

    Source: The Wonder Years

    Submit your craft! Do you have a great craft tutorial or idea you want to share and reach a wider audience? Visit my Submit page and my new, easy-to-use submission form.

    Related Posts Plugin for WordPress, Blogger...